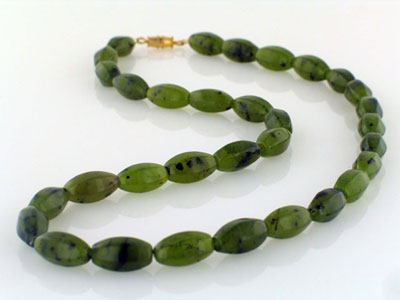
Design by Rosa Cervantes
Instructions written by Thomas Soles
Servings: 1 beautiful necklace.
Ingredients:
Beads - feel free to mix and match.
Soft Flex Wire - .019 diameter is a wonderful all purpose wire.
Clasp - a stylish clasp will make your string sing!
Crimps - a professional finish.
Tools:
Cutters - a clean cut.
Crimping Pliers - don't smash your crimps, finish it right!
Bead Board -make stringing a pleasure and not a chore.
Bead Stoppers - secure your necklace before it is crimped.
Directions:
Step 1: Lay out your beads on a bead board. This will allow you to measure the piece before you even start it and get an idea how the colors and shapes will flow when the design is strung. If you are feeling adventurous and are not concerned about the length of your necklace, you can string it freehand and skip the bead board.
Step 2: If you have opted to forgo the bead board, a bead mat will help keep your beads in one spot while you are stringing your design. The surface of the mat will hold the beads in place and prevent a nasty spill.
Step 3: Cut your Soft Flex Wire to the desired length. For the sake of this exercise, we suggest using .019 diameter, it is good for the majority of your projects - not too big, not too small, but very strong.
Step 4: This is the fun part. Time to string your first necklace. We can go two ways here, freehand or a symmetrical design.
- If a freehand approach is what you seek, grab a Bead Stopper and clip an end of the wire. The Bead Stopper will secure that end of the wire and none of your beads will escape and hide under furniture.
- If symmetry is the order of the day, leave your wire on top of your bead mat and string each side as you go. String a bead onto one side of the wire and the corresponding bead on the opposite end. If you are adding a focal bead, string that first and go from there.
Step 5: Once your design is strung, you now need to finish up and crimp your clasp into place. Open your clasp so that is two pieces. Now take one end of your wire and add a crimp bead (2x2mm crimp tubes are ideal with .019 diameter wire). Place one of the clasp pieces on the wire. Loop the wire back through the same crimp tube. Now tighten the loop so the clasp end is secure, but has a little room to play, if it is too taut, there will be extra wear on the wire. Make sure the wires inside the crimp are parallel. If the wire is criss-crossed, this will weaken the security of the crimp and it may slide. Place the crimping hole on your crimping pliers on the crimp (this is the hole with the tooth in it). Using firm pressure, squeeze the pliers and give your crimp a divot (don't smash the pliers, this will work-harden the crimp and make it brittle - use as much pressure as you would shaking your grandmothers hand). Now move the rounding hole on the pliers over the crimp. Using the same squeeze as before, round the crimp, turn it ninety degrees and round it again - repeat this process five or six times until the crimp is well rounded and has a nice, secure finish.
Step 6: Repeat step five for the other end of the wire. Make sure you use crimping pliers, they will ensure that every finished crimp has a uniform look. If you smash your crimps with regular pliers, every crimp will look different and none will have the security that crimping pliers can provide. Crimping is often the most frustrating part of the process for the beginner beader, if you need further instruction or would like to see pictures as well as an easy to follow guide, check out our tips section. A good way to get some practice is to go to bead stores or trade shows and see if they can give you a crimping demo to help you along. Many practiced beaders love to show off their tricks and meet new beading buddies, don't be afraid to ask!
Step 7: Make sure your crimped necklace has some breathing room. You don't want to crimp too close to the beads. Leave a little room so the beads can move freely. If you crimp right next to your beads, your necklace will not drape properly and the wire will be strained. Once your crimps are finished, cut the excess wire. We suggest cutting all the way up to the crimp bead for a more professional look. Past wisdom suggested leaving a tail of wire beyond the crimp and going back through the last couple of beads. We think this is unnecessary if the crimp is done well enough. Also, having a wire fine enough to double back through your beads means that you could be using too fine a wire for the job, using the largest wire that will fit through your beads once will ensure the piece as a whole is going to be strong.
Step 8: Savor your delicious new creation!
Note: It won't be long before you have mastered the one strand necklace. There is a whole world of options after that - multiple strand necklaces, stitching, lariats. Think outside the box and get creative!
