

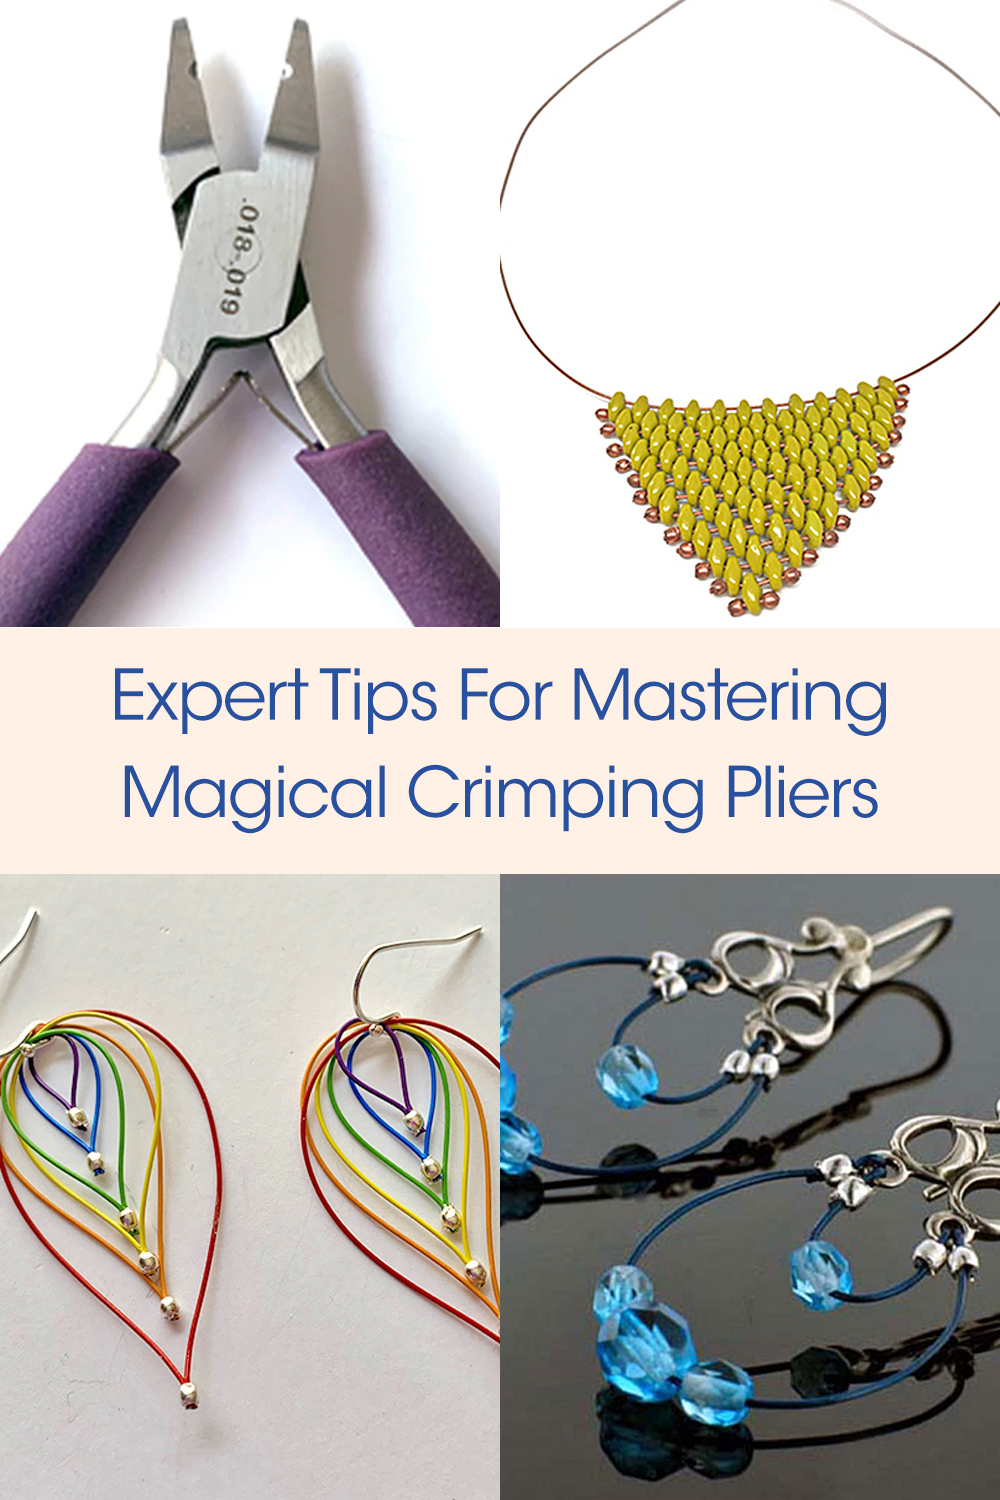
Magical Crimping Pliers are easy to use. So, why is it that you are having problems at every turn? Every jewelry making video makes it look simple and quick. But here you are turning a crimp tube into a lumpy hunk of metal instead of a beautiful rounded bead. Surely there is an easy way to master this tool! Today, we are going to look at ways to elevate your crimping skills. Magical Crimping Pliers are easy. Let's figure out what step is hanging you up and learn how to crimp like a professional!

Do you like the look of a finished crimp? Not everybody does. Regular crimping pliers fold a crimp tube into a secure bead with a divot. The finish is not the most appealing. For a long time, a good way to enhance a design was to add a crimp cover, this concealed the finished crimp bead. There is also another option: Magical Crimping Pliers. This tool turns a crimp tube into a rounded bead. You do not need to hide this finished crimp! This crimp is perfect for a finish or as a design element - floating beads on illusion necklaces with Magical Crimpers looks gorgeous. Would you like to learn how to master this wonderful tool? Let's learn how to crimp with Magical Crimping Pliers!
Learn How To Crimp And Master Your Finish With Magical Crimping Pliers
Meet The Inventor Of The Magical Crimping Pliers
Josephine is the inventor of the Magical Crimping Pliers. She was often a fixture of the Soft Flex booth during our Tucson shows. Who better to demonstrate a product than the inventor themselves? Josephine is a warm and kind spirit that has created a little magic. She showed us how to finish a crimp without putting a divot in it and making the crimp unsightly. No more hiding your crimps beneath crimp covers. Finish the job in one easy step!
What Are Magical Crimping Pliers?


Magical Crimping Pliers have a single rounding hole. This limits the pliers to 2x2mm crimps. But you can explore different diameters. If you are finishing a single strand necklace, we suggest using .019 Medium or .024 Heavy Soft Flex beading wire. You can also use Magical Crimping Pliers on multi-strand necklaces using finer diameters.
Magical Crimping Pliers are the next generation of crimping tools. If you use crimp covers to conceal a finished crimp, you will love Magical Crimping Pliers. Magical Crimping Pliers will turn an ordinary crimp tube into a finished, rounded, bead. A beautiful end to any design.
Here is the secret: regular crimping pliers have two holes, a crimping hole to place a divot in the crimp and a rounding hole to finish. Magical Crimping Pliers have a single rounding hole. This hole rounds any 2x2mm tube into a rounded bead. This quick rounding method eliminates the need for a crimp cover.
Magical Crimping Pliers are for beginner beaders and seasoned artists alike. Easy to learn and quick to master. At Soft Flex Company, we always suggest using high quality wire and crimps, such as our Soft Flex Wire and our crimps (which are seamless and thick-walled). Choosing a budget wire and crimps might not have the same strength and finish.
Finishing a crimp with Magical Crimping Pliers

String a crimp tube. If attaching a clasp or ear wire, make sure that wires lay side by side. Place the crimp tube inside the groove of the Magical Crimping Pliers and squeeze.

The pliers will pinch the four corners of the crimp tube and look like a square.

Turn the crimp tube on its side in the Magical Crimping Pliers, making sure the top of the square is up and squeeze. Rotate and squeeze a few more times. The crimp should tighten down on the wire and look like a round bead.

Mastering Your Magical Crimping Pliers
Magical Crimping Pliers are easy to use. But like all tools, there is a learning curve. Practice is going to be your best teacher. Make sure you take plenty of time to practice crimping before using your new crimping pliers for a jewelry project.
Check out Sara at Jewel School. She gives an easy to follow course on how to use Magical Crimping Pliers.
Learn how to make jewelry with Magical Crimping Pliers
How to use Magical Crimping Pliers to make DIY earrings
Getting started, 2x2mm crimps are what you want in your beading supplies.

We recommend Soft Flex Crimps, of course. Soft Flex Crimp Tubes are crafted with the professional in mind. We have constructed a crimp tube that is almost twice as thick as others on the market. The sturdier build of the crimp is enhanced by the fact that they are also seamless. Finish your next piece securely with our designer crimps.
For your first couple of crimping attempts, you can skip the professional crimps. Make sure you are using 2x2mm crimps. Make sure they are tubes. Grab a small length of beading wire, you make use an economy wire for the learning stages of this tool. .019 Medium is a great diameter for practice. Take as long as you need during this practice phase. Crimp multiple tubes. Get an idea of how it feels to crimp the tube. Get a sense of how much pressure you need to apply. You will start learning how your crimps are going to finish even before you make your second squeeze on the pliers.
Quick Tips:
- Make sure you are using .019 or .024 diameter beading wire, Soft Flex 2x2mm crimp tubes, and have at least two wires running through the crimp tube.
- Practice using the tool with crimps and scraps of wire before moving to using it on your designs. That way you aren't compounding the frustration with having to restring a design over and over.
- Loosen your grip and work on feeling the crimp sitting in the notch. You can feel when the crimp is sitting nicely in the notch with practice.


Mastery takes time, Don't rush your practice. Get acquainted with your new tool. Absorb the feeling of using it. Learn how to seat the crimps in the divot of the tool. Learn how to gauge whether your crimp is going to fold correctly - before your first squeeze. Have patience and go slow and you will learn how to do this!
Once you start feeling comfortable with your Magical Crimping Pliers, you can move to finishing jewelry designs. But don't worry, you are not going to have to restring a design if you make a mistake. If you crimp a tube and it looks messy, pull on the beading wire. Make sure your crimp is holding. It might be ugly, but if you have managed to secure the finish, you can still salvage your design. If you have crimp covers on hand, you can cover your ugly crimp. Once you get the hang of the technique, this will no longer be necessary. But when you are learning, you are bound to make mistakes. Having crimp covers means that you can correct the mistake without the hassle of restringing your jewelry each time.
Hold Your Crimping Pliers Correctly

Kristen noticed something when she first started using Magical Crimping Pliers. If she was holding her tool a certain way, it would not always reliably work for her. This sounds obvious. But what she means is that you need to check how the pliers are oriented. Pay attention to the writing on the head of the pliers and use that as a guide to figure out how you need to hold this tool.
From Kristen:
While practicing pay attention to how you are holding the tool when it works just right! I have found that one way I hold my tool works better for me then another. There is a patent number on one side of the Magical Crimping Pliers and diameters listed on the other, look at that as a guide to how to hold your pliers best for you.
How Much Pressure Do You Need To Exert On Crimping Pliers?

This is one of the biggest tips we think you should know when it comes to mastering ANY pair of crimping pliers. How much pressure should you apply when squeezing down on your crimp tubes?
A lot of beginner jewelry designers think they need to smash down as hard as they can on their crimps. After all, they do not want to have to restring their jewelry. They do not want to have the crimp slip. They want to make sure that crimp is no going anywhere. So they smash down on their poor crimps with all of their might. The problem is, metal can work harden and become brittle. Smashing your crimps down as hard as you can is a sure recipe for a failed crimp.

What you want to do is give your crimp tube a firm squeeze. Nothing more. Imagine you are shaking your grandmother's hand. Give that amount of pressure to the crimp. A firm handshake. Take pity on your crimp. A firm squeeze is all they need. Especially since all crimps need to be rounded. Crimp your tube once and then turn the tube in the rounding hole of your crimping pliers (the only hole on Magical Crimping Pliers). Crimp the tube again. Turn it slightly again. Crimp it again. Continue this process four or five times. A firm handshake each time. You now have a rounded crimp bead that is a SOLID finish. It is not going to slip. The metal is not going to be work hardened and brittle.
You have mastered the pressure of the squeeze!
Crimping On A Single Strand Of Soft Flex Beading Wire
Did you know you can crimp your crimp tubes on a single strand of wire - rather than two? This is a handy dandy way to finish illusion jewelry or jewelry where you want your crimp tubes to act as immoveable spacer beads.
Pretty early on, Sara realized that if she used a single strand of wire and a crimp tube, the crimp would end up slipping on the wire since it did not have the second wire inside the crimp to conform around. Sara figured out a simple work around. Inside the crimp, she slid a very small second scrap of wire.

If you do a lot of beading, you should have plenty of remnant wires inside your beading toolkit. Remnant wires are wire that is too long to throw away, if you don't want to be wasteful. But too short to use in a bracelet or necklace. Save your remnant wires! Remnant wires always find a way to come in handy.
Slide a second wire inside the crimp tube, the remnant wire. This wire is not part of the design. It will not be shown. It is just a very tiny length of wire. Crimp your tube down. Inside is the actual wire from the design and the tiny scrap. The crimp tube will crimp securely, since there are two wires inside. Once the crimp is secure, trim any of the tiny scrap of wire off at the crimp (make sure you do not cut the actual jewelry wire, just the scrap).
Voila! You now have a crimp tube secured on a single strand of wire!
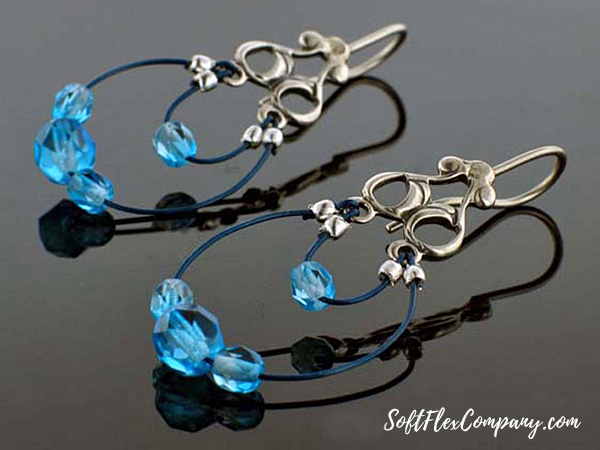
Making Jewelry With Magical Crimping Pliers: Delicate Multi Circle Necklace & Earrings Set
Now you should have a good idea how to use your Magical Crimping Pliers. Going forward, you can use your rounded crimps as a design element. You no longer have to worry about concealing your crimps. Turn your crimp beads into a focal point of the jewelry.

Start off easy. A single strand design with a crimp at each end to secure the piece. This way you can use your crimp covers, if necessary. Once you get the hang of your Magical Crimping Pliers, you should be able to make every crimp tube look perfect. It is so easy!

Making Jewelry With Magical Crimping Pliers: Learn How To Make Earrings
Make sure you take the time to practice. That is really essential to learning how to use this tool. Understand how the crimping process should feel in your hand as you go. Make sure you are not squeezing your crimp tube as hard as you can. Make sure the Magical Crimping Pliers are sitting in your hand the right way - the way that provides the best results for you!

Final Thoughts...

There was a time when we considered Magical Crimping Pliers a neat little novelty. But they have turned into a necessary tool that we keep in our collection. We still use Regular Crimping Pliers for some of our designs. But we love the look of a crimp finished with Magical Crimping Pliers. When you can easily turn a finished crimp tube into a design element, why would you want to settle for the old fashioned folded crimp look?
Join our Facebook group – VIB. Stay in the know. Stay up to date. From our bead shows to our video shows and sales, you can stay in touch with us. The community is full of artistic and helpful beaders and crafty people. Inspire and be inspired. Share your pictures and get the beading bug from others!
Visit the Soft Flex Company YouTube Channel!


Blog contributor Thomas Soles loves Jazz Age writers and crunchy french fries. His favorite gemstones are Lapis and Pietersite. His favorite hobby is day dreaming. And his favorite mustache is Freddie Mercury's. As you can see, he has a healthy (or possibly unhealthy) sense of humor. You can write to him at Thomas@SoftFlexCompany.com