

Let's have a look at kumihimo braiding! If you are reading this, it is likely you belong in one of two camps: you have a kumihimo disk and love it - or - you have a kumihimo disk and it is sitting in your jewelry making kit (it looks so complicated!). The good news is that kumihimo patterns are simple to follow and easy to master. We will look at everything kumihimo today. We have tips and tricks, instructions, a little history and so much more. This is a great resource for a beginner or if you just need some inspiration. Let's look at square kumihimo plates and round kumihimo disks.

Kumihimo braiding is easy with a disk. The disks are portable and uncomplicated. All you need to do is follow a pattern and use the numbers (or letters) on the disk to braid your cord or wire. The braid looks amazing. The finished look is wonderful for masculine or feminine jewelry designs. You can start with a kumihimo bracelet to get your feet wet and then move on to kumihimo projects with beads. It is fun to experiment with color and cord variety. You are sure to create something beautiful. Let's learn how to make kumihimo jewelry!


Everything You Need To Know About Kumihimo

What is a Kumihimo disk?
Kumihimo means 'gathered threads' in Japanese. 'Kumi' comes from the Japanese word 'kumu', which is gathering or assembling. 'Himo' is cord or string.

Kumihimo began as finger loop braiding. As the tradition was passed down, tools made the process easier. Kumihimo stands eliminated the need for finger dexterity and the space necessary for finger looping. The stands were made out of smooth wood so the cords and fibers would not snag and hinder the work. Marudai stands are circular and Takadai stands are square. To organize the threads on the stands and to keep the cord taut, artists used weighted bobbins called 'tama'.
Historically, kumihimo braids have been used in Samurai armor and weaponry. The braids were used as a functional knit for their armor pieces. Decoratively, it adorned their horses armor and the handles of their swords.
Kumihimo is still alive and prospering centuries later. Today, we have modern disks that are wonderful for artists that do not have the room or money needed to work on a Marudai or Takadai stand. Modern kumhimo disks are portable and can be used anywhere. They are made out of a foam base that does not snag the cords used for braiding. The disks have 32 notches that gently grip the cords in place. Bobbins can still be used to neatly gather the wire, but they are not necessary as the notches will allow the cords to have the tension needed.
Modern kumihimo braids are used as lace or cords. They can be added as decorative elements on clothing. They can be turned into sashes or belts. They can also be made into stunning pieces of jewelry.
Modern Kumihimo is accessible. The tools needed to begin braiding are a disk and cord. You can add bobbins if you want to keep your work tidy, we suggest using our ten foot spools of Soft Flex Beading Wire - they are perfect for organizing. You can also purchase a kumihimo weight if you want to keep your cord taut at the center with very little fuss. There is very little cost required to begin this craft. It is perfect for adults and children alike.
Kumihimo disks are incredibly affordable. Purchasing two or more will allow you to leave a design on one if you wanted to try something new on another. You can purchase a square kumihimo plate if you would like a flat braid or a round kumihimo disk of you want a thick round braid.
Kumihimo Braiding
Kumihimo disks are perfect for the designer that likes to make unique and interesting jewelry. There are tons of options for your designs. You can customize the cords, the color, and patterns. Every design can be tailor made to show off your unique style and fashion.
Select a cord or wire:
Yarn is delicate and has a wonderful drape. There is a wide range of textures and colors if you love yarn. Yarn is inexpensive and is an ideal starter cord. You can really get an understanding of how your kumihimo disk works with a little practice with yarn. Yarn is forgiving and easy to course correct if you make mistakes.
Paracord is sturdy and rugged. Paracord is a fantastic choice if you are creating jewelry for men. You can opt for muted and earthy colors or flashy and vibrant tones. The bracelets are thick and eye catching but not extravagant. Paracord designs with kumihimo disks can turned into survival bracelets. Survival bracelets are used by hikers, survivalists, and other outdoors folk that need options when emergencies arise. The bracelet can be disassembled so the cord can be used for emergencies. these bracelets can also have compasses for clasps and more survival elements.
Thread is great for very fine designs. Thread by itself will make very tiny designs. Thread can be added to designs with other cords and fiber for a textured look. Thread is fun, but is not going to be the most study. It is economical, but yarn is a better choice if you want to practice.
Fiber is great choice for earthy jewelry. Hemp fiber is fun for the person that loves all things hippy or bohemian. Fiber can be used in male or female designs. Fiber is perfect for the beach. Add some bone or wood beads and you have a magical piece of jewelry.
Silk and Satin are lush and decadent choices for your designs. Who doesn't love the feeling of these materials? Satin cords have such a lovely sheen and silk comes in so many shapes and sizes. These cords will offer choices in color and texture.

Soft Flex Beading Wire is perfect for beaded designs or smaller finishes. If you braid with Soft Flex by itself, the wire is small and great for delicate looking jewelry that is actually incredibly sturdy (our beading wire is constructed out of stainless steel). There is a wide range of colors to make every piece a signature design. Add some beads and your designs can be elaborate as you like or minimalist and interesting.

Soft Flex Craft Wire is for patient and skilled designers. This wire is not as forgiving as other options. You will want to make sure you have some hours under your belt before attempting a Craft Wire pattern. The finish is absolutely stunning and worth the extra effort. But you will definitely need to practice to achieve the design you want. Check out James video as he learns how to use this option.
Be adventurous. You need not stick with a single color on your designs or a single cord or wire. Mixing things up makes for interesting designs. If you braid with yarn and thread together, the design will have an unusual texture as the thread intermingles with the yarn.
If you select a multi-colored design, depending on how you have set the colors up on your disk, your patterns will look strikingly different each time. There is an exciting assortment of choices. Pick the patterns that speak to you!
Kumihimo Supplies
There are tons of choices when purchasing your first kumihimo tool set. You will need to grab your preferred cord. You need the disk itself. You need findings to close your work. You need beads if you want to accent your designs or make a bead focused piece of jewelry. Let's take a look at the essentials and the fun stuff!
Kumihimo jewelry kits - If you have no tools and need to purchase everything to kick off your new hobby, jewelry kits are a fun choice. These kits are prepackaged for a specific design. Inside you will find all of the beads and tools you need to create the design. There are instructions and useful information. Kits for specific designs tend to run a little pricier than buying individual items or just the tools as you are paying for the beads and a stunning pattern.
Kumihimo starter kits - These kits are great if you need all of the tools but do not want a pattern. You will often find some deals on kits like this. These kits allow you to purchase everything in one buy. This is great if you do not know what you are shopping for or do not have the time to shop.
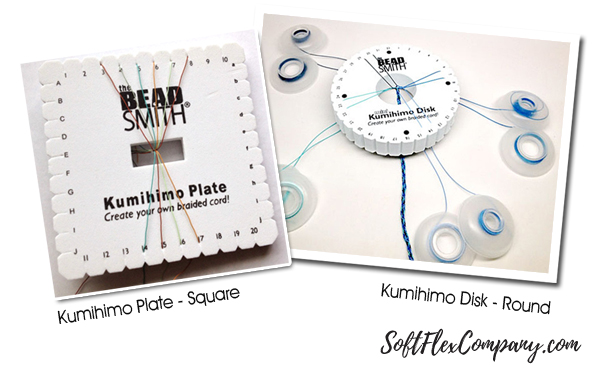
Kumihimo Disk - Round - Do you want a rounded braid that is great for necklaces and bracelets? You will need to buy a round disk. At Soft Flex Company, we offer disks that are double density foam. These disks are much thicker than other kumihimo disks. They are great for harder cord or wire, but also perfect for soft thread and silk. Soft Flex Beading Wire is a stainless steel wire that is a great fit with a double density disk.
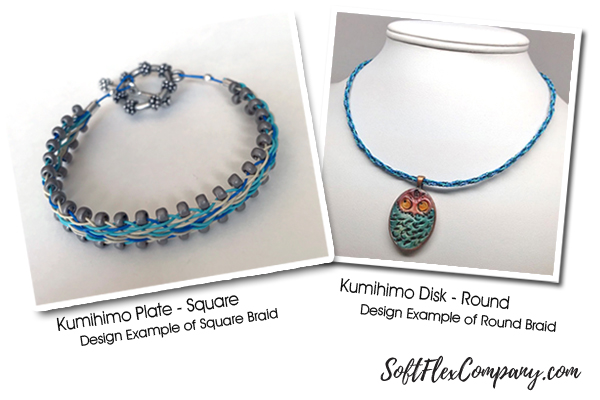
Kumihimo Plate - Square - Do you want a flat braid that is great for bracelets or Craft Wire rings? Buy a square plate. Square kumihimo plates offer an exciting new look if you are accustomed to working with round boards. The flat braids are great for a piece of jewelry with or without beads. If you work with Soft Flex Craft Wire, the square plate is great for layered effects too. Which board speaks to you?

Cord or Beading Wire - So many choices out there. Play with any and all options. Your beading wire designs will look vastly different from your thread designs. Your silk necklace will have a glow that your fiber designs will not. Experiment and find the style you love!

Findings - You need to close your design. You can play with your favorite way to finish your designs. If you are working with silk, satin, and fiber - you can glue your cut cords into an end cap, binding the cords with thread beforehand is a good way to ensure the cords are cut evenly. If you are working with Soft Flex Beading Wire, there are a million clasps that would look lovely with your design. Find a fun one! You can also hide the end of a beading wire design in a purchased cone or Craft Wire messy wrapped cone, before the crimp and clasp.

Tools - You need a couple tools to get you along your journey. Scissors are fine if you are working with a soft cord, but make sure you have beading wire cutters on hand for the wire. Optional are tools like bobbins. You can find weighted bobbins if you have an issue with your cords coming out of the notches or just prefer a taut and firm design. You can find a weight with alligator teeth that clutches to the wire or cord at the center of your design. This weight will ensure that all of your wire has the right tension as you braid it.
How to Kumihimo

Here are some simple steps to help you start off creating braids.
Start your braid with position #32 at the top. Always keep tension on your lanyard while creating it by attaching a binder clip to the end of the braid.
Pick a medium - silk, thread, wire, cloth, or ribbon. Choose a variety of textures and colors. Be creative.
The thickness and length of your pieces can vary. For bracelets, start with 8 cords cut at 48 inches long (this will ensure that your piece can be shortened as necessary and will accommodate different materials). Belts, 8 cords cut at five yards. Key rings, 8 cords cut at 36 inches long. Or get inventive and go longer or shorter. There are no hard and fast rules.

Round Kumihimo Instructions
Step 1: Cut eight strands of beading wire. Wrap each strand onto a bobbin leaving a 6 inch length of wire.
Step 2: Gather all wires and attach a bead stopper on one end leaving a 2 inch tail.
Step 3: Place the bead stopper through the hole in the middle of the round kumihimo board and attach wire bobbins onto the left and right of each of the following numbers: 8, 16, 24 and 32.
Step 4: With 32 at the top, take the wire on the bottom left and secure it on the top left, to the left of 31. Then, take the wire on the top right and secure it on the bottom right, to the right of 15 (when 15 is upside down).
Step 5: Turn the kumihimo board counterclockwise.
Step 6: With 8 at the top, take the wire on the bottom left and secure it on the top left, to the left of 7. Then, take the wire on the top right and secure it on the bottom right, to the right of 23 (when 23 is upside down).
Step 7: Repeat Steps 4-6 until you reach your desired length.
Step 8: Trim the wire from the board and bobbins leaving at least a 2 inch tail.

Square Kumihimo Instructions
Step 1: Cut ten strands of beading wire. Wrap each strand onto a bobbin leaving a 6 inch length of wire.
Step 2: Gather all wires and attach a bead stopper on one end leaving a 2 inch tail.
Step 3: Place the bead stopper through the hole in the middle of the square kumihimo board and attach wire bobbins into 3, 4, 5, 6, 7 and 8 on the top and 14, 15, 16 and 17 on the bottom.
Step 4: Move the wire at 6 to E. Then, move the wire at 5 to e.
Step 5: Move the wire at 16 to 6. Then, move the wire at 7 to 16.
Step 6: Move the wire at 17 to 7. Then, move the wire at 8 to 17.
Step 7: Move the wire at e to 8.
Step 8: Move the wire at 15 to 5. Then, move the wire at 4 to 15.
Step 9: Move the wire at 14 to 4. Then, move the wire at 3 to 14.
Step 10: Move the wire at E to 3.
Step 11: Repeat Steps 4-10 until you reach your desired length.
Step 12: Trim the wire from the board and bobbins leaving at least a 2 inch tail.
Finish Your Kumihimo Design
You have an amazing design. Now let's finish it. We have options for you. Like every other part of this wonderful beaded art form, you can make your finish a personal statement. They way you finish each piece is important, make it fit the spirit of your braided jewelry. You can finish your work with homemade cones and clasps. You can glue everything into an end cap, which is simple and will not detract from the rest of the piece. Or you can make the design long enough so you won't need a clasp, but can slip it on and off. Let's check out some options!
Finish your Soft Flex Beading Wire kumihimo
If you are working with Soft Flex Beading Wire, like Sara is in the video above, you can use cones, crimps, and a clasp to finish your design. Soft Flex is easy and wonderful with a kumihimo disk. You can secure the ends of your design with Bead Stoppers if you need help organizing the wire before crimping.

Step 1: Take an end. Pinch the wires at the point where you desire to crimp the design.
Step 2: Push the 8 strands of your design through a 3x3mm Crimp Tube.

Step 3: Crimp the bead once it is in place and where you want to set it.
Step 4: Cut 7 of the 8 wires at the crimp. Leave a single wire at full length.
Step 5: Slide the remaining wire through a cone. The cone will conceal your crimp.

Step 6: Add a 2x2mm Crimp Tube.
Step 7: Add half of your clasp. The other half will be on the other end.
Step 9: Loop back through your crimp. This will leave the clasp inside the loop.
Step 10: Crimp your 2x2mm Crimp Tube. Cut the excess wire at the crimp.
Step 11: Repeat on the opposite end.

Remember, the way you finish your design is up to you. If you do not like cones, you do not need to add them. You can just leave the crimp on the wire and let it show. If a finished crimp is not something you find appealing, you can cover the crimp with a crimp cover. If you want to think outside the box, you can do what Kristen does occasionally and wire wrap a messy wrapped cone. This is basically a free hand cone created with Soft Flex Craft Wire. This will leave your design with an organic and fun finish.

Finish your Soft Flex Craft Wire kumihimo
If you are working with Soft Flex Craft Wire, you can bend your wires back through the design. For instance, if you have created a ring, cut your wires were you want to finish the design. At this point, you can use round nose pliers or chain nose pliers to individually manipulate the cut wires. Loop them back through the design or compress the wire into parts of the ring. You can work harden the wire to keep them in place.
If you are designing a longer piece of jewelry with Soft Flex Craft Wire, like a bracelet, you can follow a path similar to the Soft Flex Beading Wire finish.
Step 1: Take an end. Twist the wires into a small tight coil or coil a single wire around the bunch.
Step 2: Once the wire are in a smaller coil, clamp down with pliers to work harden the wire.
Step 3: Cut 7 of the 8 wires at the secured spot. Leave a single wire at full length.
Step 4: Slide the remaining wire through a cone or create a unique messy wrapped cone.
Step 5: Take the single wire and secure it into a clasp.
Step 6: Repeat on the opposite end.
Finish your cord or fiber kumihimo
If you are working with thread, fiber,silk or a softer cord, you can glue your design into an end cap. You can secure the ends of your design with thread, tightly wrapped around your cords, if you need help organizing the cords before gluing into an end cap. You can find clasps and end caps that are designed for kumihimo threads at local bead stores that carry a selection of kumihimo items.
Step 1: Take an end. Pinch the cords at the length you want to finish your design.
Step 2: Tightly wrap thread around the area you intend to cut your design. This will hold everything together.
Step 3: Cut the cord. It will now be a stump with thread coiled around the top.
Step 4: Glue the end into a kumihimo clasp or end cap.
Step 5: Repeat on the opposite end.
Finish your paracord kumihimo
If you are working with paracord, you can burn the ends of your design with a lighter to secure them, instead of gluing them. Burning the ends of the cord will fuse it together. This makes it really easy to end a design. Just make sure you minimize the scorched part of the paracord so it is easy to conceal. Paracord can be finished with a clasp, a stopper knot, and more. The process here is basically the same for cord, but this time you burn the ends of the cord. You can find clasps at craft and hobby shops that are tailor made for paracord designs. Paracord can be knotted, tied, glued or fused. You can finish with a clasp or create a stopper knot.
Step 1: If you are finishing with a clasp, slide your paracord through it.
Step 2: Loop your paracord back, so the clasp is secure inside the loop.
Step 3: Burn the ends of your cut paracord and fuse it to an area inside the bracelet (this will conceal it).
Kumihimo Beading
Beads add a unique element to kumihimo designs. Beaded kumihimo can really stand out. You can braid with sparse beads on your jewelry or you can have a full beaded necklace or bracelet. Beaded patterns will be vivid with color. Add a beaded symbol to your kumihimo jewelry - a Christmas tree or star would be fun for the holidays. You can craft a snake skin pattern. You can even fade solid colors into other solid colors. The more bead dense and intricate your designs are, the more talent you are going to need. Start simple with a bead here and there and go full beaded glory as you hone your skill!
Make sure you stock up on Soft Flex Beading Wire. Our wire is an outstanding choice for your next kumihimo design. The assortment of colors we carry will allow you to expose the wire on your kumihimo designs and make the wire part of the piece. You can also conceal our wire with beads. Soft Flex Beading Wire is extremely flexible and durable and your kumihimo design will last for years and years to come.
Kumihimo Patterns
Your kumihimo designs are going to change with every color of cord or beading wire you use. You can choose multiple colors for each design or keep it simple. If you would like an idea of how your color choices will look before you braid them, you can look for a kumihimo pattern planner or generator online.
One of my favorite planners is from Lytha Studios. Their KumiPlanner is exceptionally easy to use and really in depth. You can change the colors of the displayed braid or you can set the disk up to your liking. This is a solid tool for forecasting how your jewelry is going to look before you ever add a single cord to your disk.
Craft Design Online has a great planner that offers the finished braid image. It also shows how to replicate the finished braid on a disk or a Marudai. You can also add more strands than eight on this planner. This makes it easy to plot a strand heavy design.
Friendship-Bracelet.Net has a nice kumihimo generator. You can add and remove the amount of cords you want to check out. You can set the colors. It also has a pre-set pattern for a cute floral design as the default. This is certainly a friendly pattern planner.
If you do not want to use a kumihimo planner, you can always visit Pinterest for inspiration and forecast ideas. There are plenty of users that have uploaded color templates. These templates are static, you cannot make changes to the color, but you can easily reference them or get inspired by a color pattern.
Join our
Facebook group – VIB. Stay in the know. Stay up to date. From our bead shows to our video shows and sales, you can stay in touch with us. The community is full of artistic and helpful beaders and crafty people. Inspire and be inspired. Share your pictures and get the beading bug from others!
Visit the
Soft Flex Company YouTube Channel!


Blog contributor Thomas Soles loves Jazz Age writers and crunchy french fries. His favorite gemstones are Lapis and Pietersite. His favorite hobby is day dreaming. And his favorite mustache is Freddie Mercury's. As you can see, he has a healthy (or possibly unhealthy) sense of humor. You can write to him at Thomas@SoftFlexCompany.com