

The most ghoulish time of the year is approaching. Learn how to make beaded jewelry for Halloween. Spooky scary skeletons and grinning goblins will be jealous of your macabre fashion sense. Grab your jewelry making supplies and lets design some wonderful holiday jewelry.

Celebrate your darker side. Halloween jewelry is fun and steeped in shadow. It is a great time to design gifts for friends and family that need a Trick-or-Treat accent. If you need some ideas, follow along. If you have some great Halloween jewelry you have made, feel free to show it off in our Facebook group - VIB. We love to share ideas and jewelry inspiration.

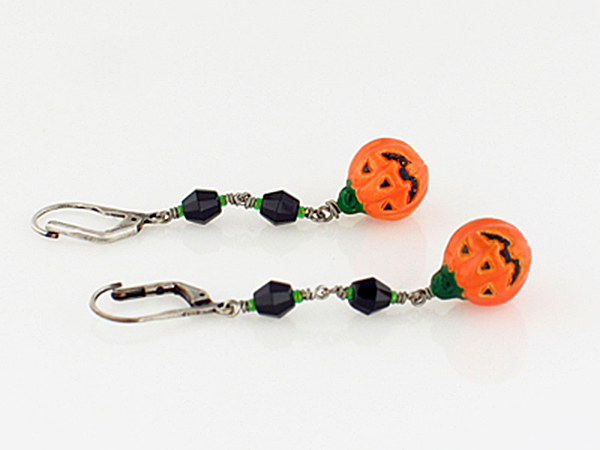
Jack O' Lantern Earrings
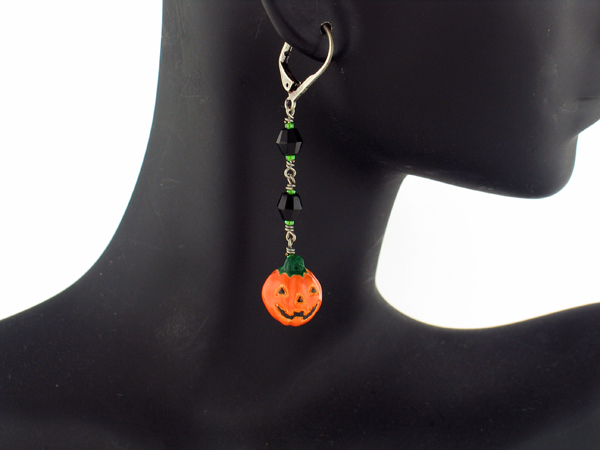
Earrings are fun. This simple beaded earring is a fun Halloween highlight. If you do not like jack-o'-lanterns, you can always go for something more ghostly.
Designer Jamie Hogsett
Skill Level Beginner
Materials
24 Gauge Non Tarnish Silver Craft Wire
Antique Silver Lever Back Earrings - 1 pc
24 Gauge Silver 1 1/2" Head Pins - 2
Green White-Lined Size 11 Seed Beads - 12
5mm Black Faceted Czech Glass Bicones - 4
11x13mm Ceramic Jack O Lantern Beads - 2
Tools
Cutters
Chain Nose Pliers
Round Nose Pliers
Instructions
Finished Size: 2 1/8"
Step 1: Use 1 head pin to string 1 jack o lantern bead and 2 seed beads. Form a wire wrapped loop.
Step 2: Use 2" of 24-gauge wire to form a wire wrapped loop that attaches to the previous loop. String 1 seed bead, 1 bicone, and 1 seed bead. Form a wire wrapped loop.
Step 3: Repeat Step 2, attaching the final wrapped loop to 1 lever back earring.
Step 4: Repeat Steps 1-3 for a second earring.
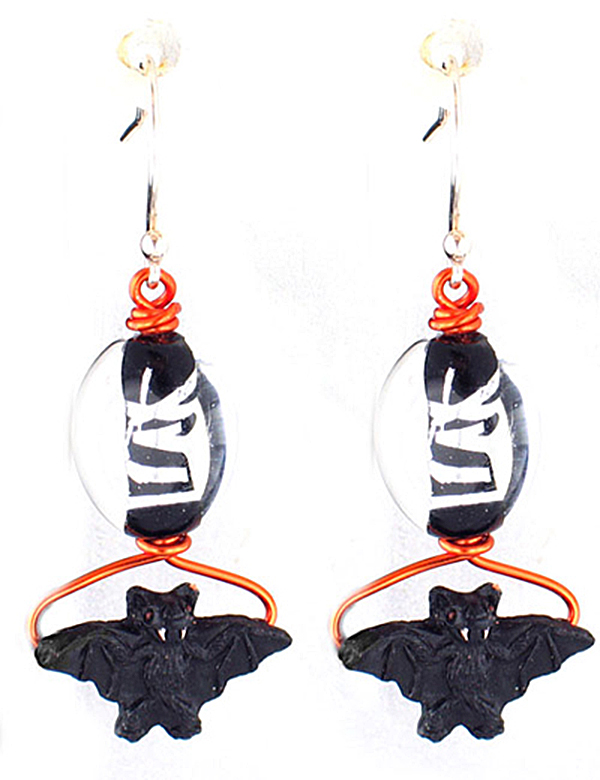
Batty Earrings

We are batty for earrings. These are easy to make. If you enjoy wire wrapping, you can always add your own accents to the piece.
Designer Jamie Hogsett
Skill Level Beginner
Materials
20 gauge Orange Soft Flex Craft Wire - 12"
Silver Ear Wires with Ball - 1 pair
17x12mm Ceramic Teeny Tiny Bat Beads - 2 pcs
12x14mm Czech Clear/Black Silver Foil Lampwork Ovals - 2 pcs
Tools
Round Nose Pliers
Chain Nose Pliers
Cutters
Instructions
Finished Size: 1 7/8"
Step 1: Use 6" of wire to string 1 bat bead. Place the bead about 1 1/2" from one end of the wire. Bend the wire ends up around the top of the bat until they meet just above the bat's head. Use chain nose pliers to bend the long end of the wire so that it is perpendicular to the top of the bat's head. Use the short end of wire to wrap around the long length of wire. Trim the short wire end.
Step 2: Use the long wire end to string 1 oval. Form a wire-wrapped loop that attaches to 1 ear wire.
Step 3: Repeat Steps 1 and 2 for a second earring.
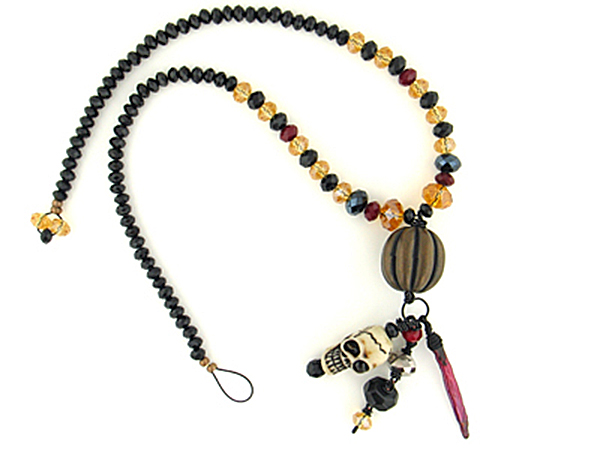
Floor Beads Treasure Necklace
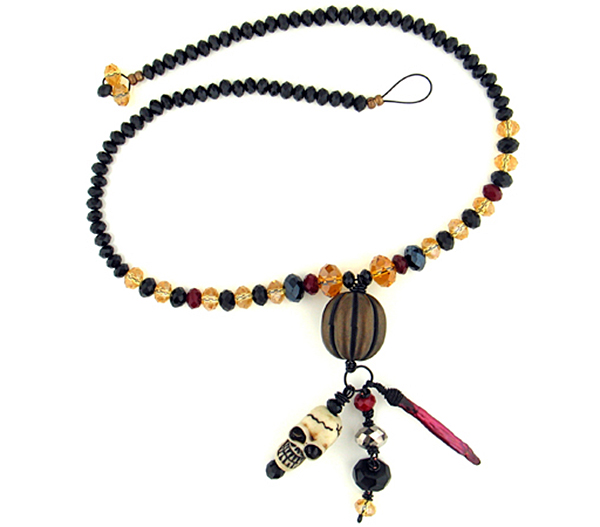
If you have never visited a bead show, you need to make plans. Floor beads are the best part of every show. Floor beads are the beads that slip off tables and out of bags. These rogue beads manage to hide on the ground until a lucky person finds them. This haunted necklace was designed from a collection of floor beads.
Designer Jamie Hogsett
Skill Level Beginner
Materials
Black Onyx Soft Flex Beading Wire .024 diameter
20 gauge Black Soft Flex Craft Wire
26 gauge Black Soft Flex Craft Wire
2x3mm Gold-Filled Crimp Tubes - 2 pcs
4mm x 2mm Brass Crimp Covers/Spacers - 4 pcs
6mm x 4mm Black Faceted Rondelles - 70 pcs
8mm x 6mm Black Faceted Rondelles - 9 pcs
8mm x 6mm Amber Faceted Rondelles - 13 pcs
8mm x 6mm Red Faceted Rondelles - 5 pcs
10mm x 7mm Black Faceted Rondelles - 2 pcs
12mm x 8mm Amber Faceted Rondelles - 2 pcs
12mm x 8mm Silver Faceted Rondelle - 1 pc
14mm x 7mm Black Faceted Rondelle - 1 pc
5mm x 23mm Red Stick Pearl - 1 pc
14mm x 27mm Skull Bead - 1 pc
24mm Bass Fluted Round - 1 pc
(Beads are "floor beads," found on the floor after a bead show.)
Tools
Cutters
Chain Nose Pliers
Round Nose Pliers
Needle Nose Pliers
Crimping Pliers
Instructions
Finished Size: 19 1/4"
Step 1: Use 6" of 26 gauge wire to form a wire-wrapped bail on the red stick pearl. Set aside.
Step 2: Use 2" of 20 gauge wire to form a head pin. Use the head pin to string one 8mm x 6mm amber rondelle. Form a wire-wrapped loop. Use 2" of 20 gauge wire to form a wire-wrapped loop that attaches to the previous loop. String the 12mm x 7mm black rondelle and form a wire-wrapped loop. Use 2" of 20 gauge wire to form a wire-wrapped loop that attaches to the previous loop. String the silver rondelle and form a wire-wrapped loop. Use 2" of 20 gauge wire to form a wire-wrapped loop that attaches to the previous loop. String 1 red rondelle and form a wire-wrapped loop. Set aside.
Step 3: Use 8" of 20 gauge wire to form a wire-wrapped loop that attaches to one 8mm x 6mm black rondelle. String the skull bead (bottom to top) and one 6mm x 4mm black rondelle. Form a wire-wrapped loop. Set aside.
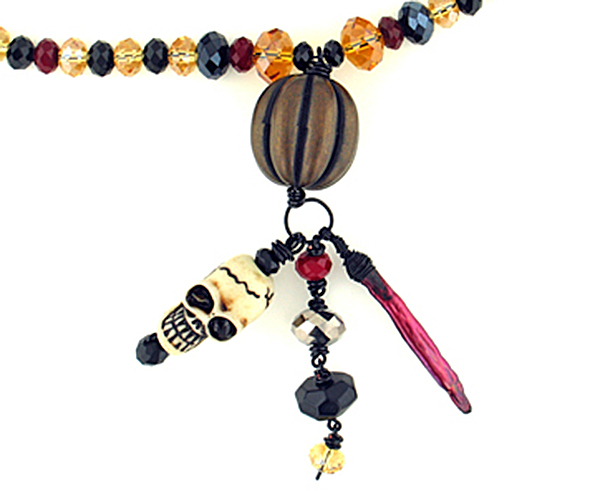
Step 4: Use 8" of 20 gauge wire to form a large wire-wrapped loop that attaches to the wrapped loops formed in Steps 1 through 3. String the brass fluted round and form a wire-wrapped loop. Set aside.
Step 5: Use 24" of beading wire to string 1 crimp tube, one 8mm x 6mm amber rondelle, one 6mm x 4mm black rondelle, and one 8mm x 6mm amber rondelle. Pass back through the tube and crimp.
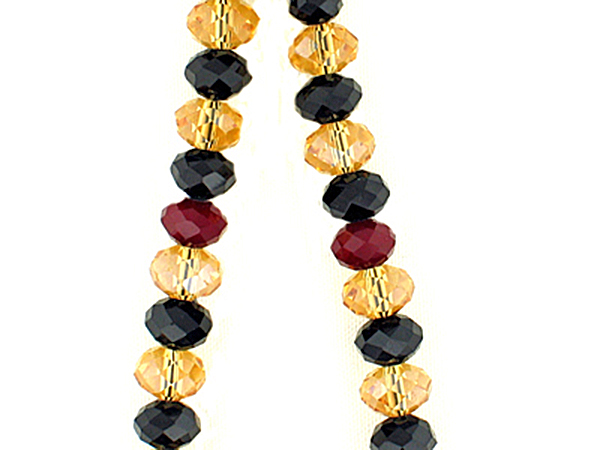
Step 6: String 2 crimp covers/spacers, thirty-four 6mm x 4mm black rondelles, one 8mm x 6mm amber rondelle, one 8mm x 6mm black rondelle, one 8mm x 6mm amber rondelle, one 8mm x 6mm black rondelle, 1 red rondelle, one 8mm x 6mm amber rondelle, one 8mm x 6mm black rondelle, one 8mm x 6mm amber rondelle, one 8mm x 6mm black rondelle, one 8mm x 6mm amber rondelle, one 10mm x 7mm black rondelle, 1 red rondelle, one 12mm x 8mm amber rondelle, and one 6mm x 4mm black rondelle.
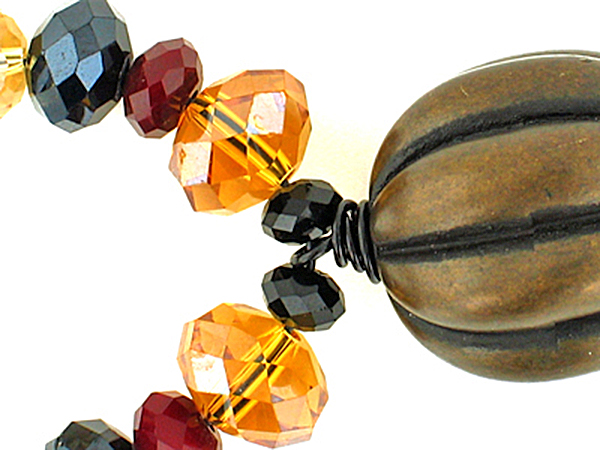
Step 7: String the pendant set aside in Step 4. Repeat Step 6, reversing the stringing sequence.
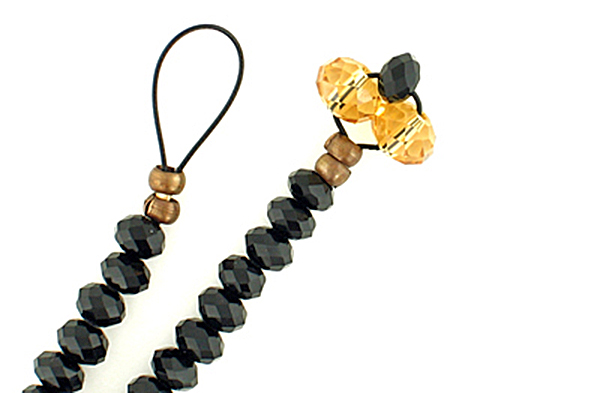
Step 8: String 1 crimp tube. Pass the wire back through the tube, leaving a loop of wire large enough to secure around the loop of beads formed in Step 1. Crimp the crimp tube.
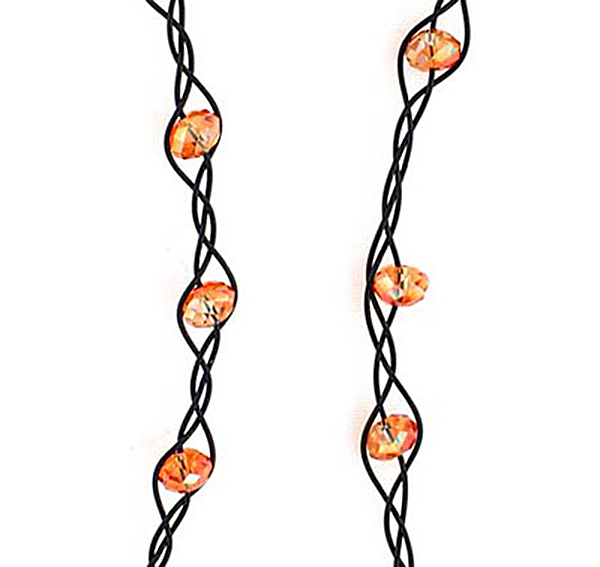
Halloween Bracelet
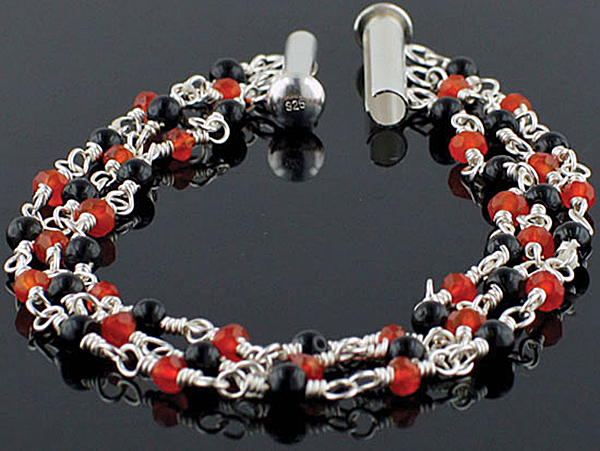
This scary bracelet was created with linked Craft Wire.
Designer Virginia Magdaleno
Skill Level Intermediate
Materials
26 gauge Non-Tarnish Silver Soft Flex Craft Wire - 1 spool
Sterling Silver 3 Strand Slide Clasp - 1 set
Orange Bead - Approx. 26 pcs
5mm Black Tourmalines - Approx. 26 pcs
Tools
Needle Nose Pliers
Round Nose Pliers
Cutters
Instructions
Step 1: Use cutters to cut 2 inches of wire from the spool. Form a wire wrapped loop that attaches to the first loop of one half of the clasp. String 1 black tourmaline bead and form a wire wrapped loop.
Step 2: Use 2 inches of wire to form a wire wrapped loop that attaches to the previous wire wrapped loop. String 1 orange bead and form a wrapped loop. Use 2 inches of wire to form a wire wrapped loop that attaches to the previous wire wrapped loop. String 1 black tourmaline bead and form a wrapped loop.
Step 3: Repeat Step 2 seven times, attaching the final wire wrapped loop to the first loop of the other half of the clasp.
Step 4: Use cutters to cut 2 inches of wire from the spool. Form a wire wrapped loop that attaches to the middle loop of one half of the clasp. String 1 orange bead and form a wire wrapped loop.
Step 5: Use 2 inches of wire to from a wire wrapped loop that attaches to the previous wrapped loop. String 1 black tourmaline bead and form a wire wrapped loop. Use 2 inches of wire to form a wire wrapped loop that attaches to the previous wrapped loop. String 1 orange bead and form a wire wrapped loop.
Step 6: Repeat Step 5 seven times, attaching the final wire wrapped loop to the middle loop of the other half of the clasp.
Step 7: Repeat Steps 1-3, using the last loops of the clasp, to form the third strand of the bracelet.
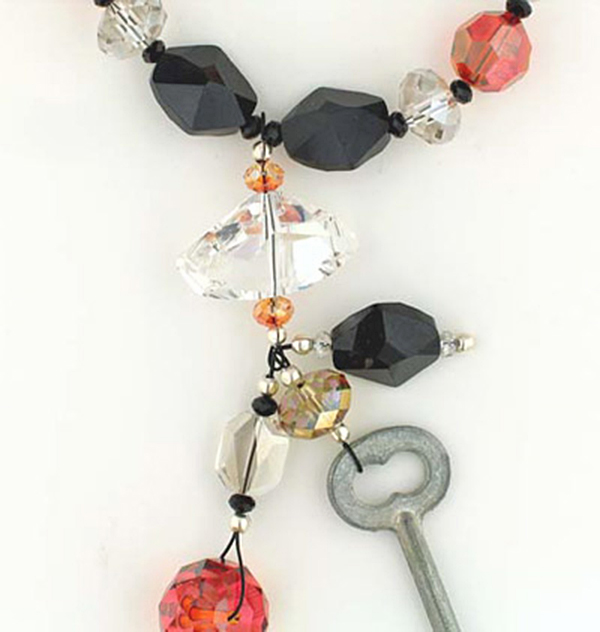
Key to the Treasure Chest Necklace
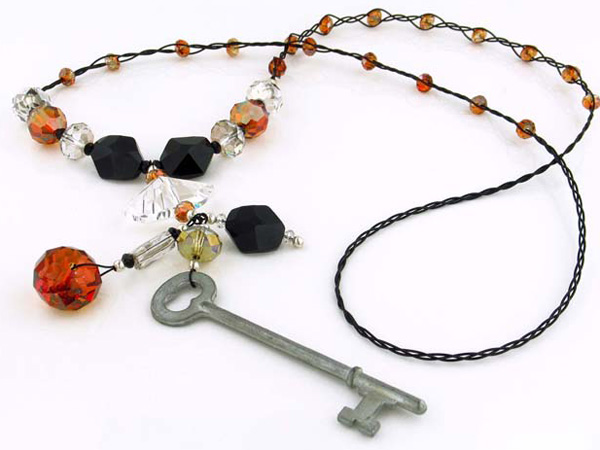
There is something scary in the attic. Carry a key as a talisman!
Designer Jamie Hogsett
Skill Level Intermediate
Materials
Black Onyx Soft Flex Beading Wire .024 diameter
Black Onyx Soft Flex Beading Wire .019 diameter
2x2mm Sterling Silver Crimp Tubes - 8 pcs
3x3mm Sterling Silver Crimp Tubes - 2 pcs
3mm Sterling Silver Crimp Covers - 8 pcs
4mm Sterling Silver Crimp Covers - 2 pcs
75mm Antique Key from - 1 pc
4x3mm Crystallized Swarovski Elements Silver Shade Rondelles - 2 pcs
4x3mm Crystallized Swarovski Elements Jet Rondelles - 12 pcs
6x4mm Crystallized Swarovski Elements Crystal Chili Rondelles - 20 pcs
12x8mm Crystallized Swarovski Elements Silver Shade Rondelles - 4 pcs
12x8mm Crystallized Swarovski Elements Crystal Verde Rondelle - 1 pc
18mm Crystallized Swarovski Elements Crystal Copper Rondelle - 1 pc
12mm Crystallized Swarovski Elements Crystal Red Magma Round - 1 pc
12mm Crystallized Swarovski Elements Silver Shade Graphic Bead - 1 pc
16mm Crystallized Swarovski Elements Jet Cosmic Beads - 3 pcs
27x15mm Crystallized Swarovski Elements Crystal Moonlight Galactic Bead - 1 pc
Tools
Crimping Pliers
Cutters
Mighty Crimpers
Bead Stoppers
Instructions
Finished Size: 28" plus 5 1/4" dangle
Step 1: Use 3" of .019 diameter wire to string one 2mm crimp tube to the very end of the wire. Crimp the tube and cover it with a 3mm crimp cover. Use the other end of the wire to string one 4x3mm silver shade rondelle, 1 Cosmic bead, one 4x3mm silver shade rondelle, and one 2mm crimp tube. Pass back through the tube, leaving a small loop of wire, and crimp. Cover the tube with a 3mm crimp cover. Set aside.
Step 2: Use 4" of .019 diameter wire to string one 2mm crimp tube and the antique key. Pass back through the tube, snug the tube close to the key, and crimp. Cover the tube with a 3mm crimp cover. Use the other end of the wire to string 1 crystal Verde rondelle and one 2mm crimp tube. Pass back through the tube, leaving a small loop of wire, and crimp. Cover the tube with a 3mm crimp cover. Set aside. Click here for crimping instructions.
Step 3: Use 5" of .019 diameter wire to string one 2mm crimp tube and the crystal copper rondelle. Pass back through the tube, making sure the wires are even on the sides of the rondelle, and crimp. Cover the tube with a 3mm crimp cover. Use the other end of the wire to string 1 jet rondelle, the Graphic bead, 1 jet rondelle, and one 2mm crimp tube. Pass back through the tube, leaving a small loop of wire, and crimp. Cover the tube with a 3mm crimp cover
Step 4: Use 4" of .019 diameter wire to string one 2mm crimp tube, the open loop of wire formed in Step 1, the open loop of wire formed in Step 2, and the open loop of wire formed in Step 3. Pass back through the tube, leaving a small loop of wire, and crimp. Cover the tube with a 3mm crimp cover. Use the other end of wire to string 1 crystal chili rondelle, the Galactic bead, 1 crystal chili rondelle, and one 2mm crimp tube. Pass back through the tube, leaving a small loop of wire, and crimp. Cover the tube with a 3mm crimp cover.
Step 5: Cut 9" of .024 diameter wire. Place a Bead Stopper on one end of the wire. Use the other end of the wire to string one 3mm crimp tube, 1 jet rondelle, one 12x8mm silver shade rondelle, 1 jet rondelle, 1 crystal red magma round, 1 jet rondelle, one 12x8mm silver shade rondelle, 1 jet rondelle, 1 Cosmic bead, 1 jet rondelle, the loop of wire formed in Step 4, 1 jet rondelle, 1 Cosmic bead, 1 jet rondelle, one 12x8mm silver shade rondelle, 1 jet rondelle, 1 crystal red magma round, 1 jet rondelle, one 12x8mm silver shade rondelle, 1 jet rondelle, and one 3mm crimp tube. Place a Bead Stopper on the wire end. Set aside.
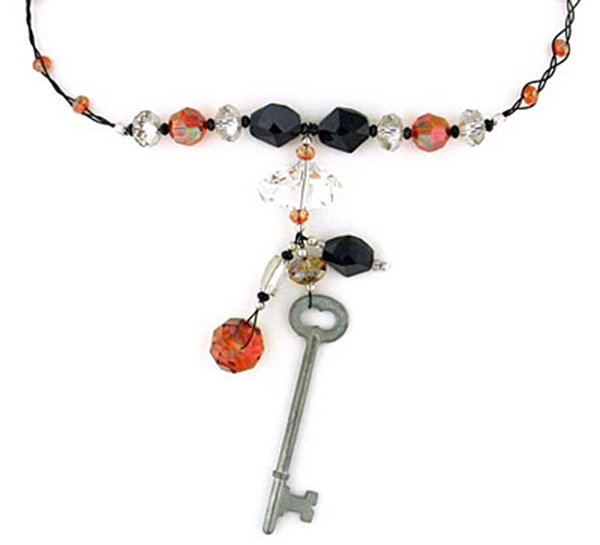
Step 6: Cut three 35" pieces of .024 diameter wire. Place one Bead Stopper on one end of all three wires, about 2" from the wire ends. Use 1 wire to string 18 crystal chili rondelles. Place a Bead Stopper on the end of this wire.
Step 7: Braid the wires for about 1/2", then move one rondelle up and incorporate it into the braid.
Step 8: Repeat Step 7 eight times. Braid the wires for about 10 1/2". Move one rondelle up and incorporate it into the braid. Repeat Step 7 eight times.

Step 9: Remove the Bead Stopper holding the single strand of wire and remove one of the Bead Stoppers used in Step 5.
Step 10: Pass the three braided wire ends through the crimp tube in the opposite direction as the wire already through the tube. Adjust the braided wires so that the crimp tube is about 1/2" from the first crystal rondelle, and crimp. Cover the tube with a 4mm crimp cover. Carefully trim wire ends.
Step 11: Remove the remaining Bead Stoppers and repeat Step 5, making sure to snug the beads strung onto the single .024 diameter wire before crimping. Carefully trim wire ends.

Join the fun in our VIB Facebook Group today! Stay in the know. Stay up to date. From our bead shows to our video shows and sales, you can stay in touch with us. The community is full of artistic and helpful beaders and crafty people. Inspire and be inspired. Share your pictures and get the beading bug from others!
Visit the Soft Flex Company YouTube Channel!


Blog contributor Thomas Soles is the Trade Show Coordinator for Soft Flex Company. His favorite stones are Lapis and Pietersite. His favorite hobby is day dreaming. And his favorite mustache is Tom Selleck's. As you can see, he has a healthy (or possibly unhealthy) sense of humor. You can write to him at Thomas@SoftFlexCompany.com