

A well-made wrapped loop is one of the most useful and common ways to make connections in jewelry work. Indeed, you will find at least one basic tutorial in almost every bead website, magazine, and book. It would seem then, given the abundance of instructions and simplicity of design, that every wrapped loop would be done with perfection, yet this is not the case. Why? Perhaps, because (for some of us), basic is just not enough, maybe not, (um) ... complicated and confusing enough!

An Obsessive's Guide to the Wrapped Loop!
Really, I prefer to say that some tutorials are just not detailed, thorough, and complete enough to meet my obsessive needs! I have not found one yet, so I made my own!
All silliness aside, for the beginner, this tutorial has described the wrapped loop, in detail, from start to finish. For the more experienced, who are accomplished at making the wrapped loop, but still have a question about a particular aspect in the execution of the wrapped loop, perhaps you will find the answer here!
A Good Wrapped Loop Begins with Good Tools and Safe Practices!
- Your tools must feel comfortable in your hands: Tools are made in different sizes, for large and small hands. Many tools have thicker and better quality padding on their handles then others. Take advantage of these options. Your hands will love you for it!
- Your tools should be easy to use: You should not have to use much pressure to get your tool to work. Most tools have devices (such as springs and prongs) that facilitate the opening and closing of their jaws. Choose these tools. The alternative is that some tools have nothing between the jaws. You will have to work harder to use them.
- You MUST use protective eyewear: Cut wire is sharp and can fly with a great deal of force. One tiny piece can blind you in a fraction of a second. Protective eyewear is very inexpensive and easy to find. You will be more likely to wear a pair that is lightweight and that fits you well.
- Good tools make your work look better and your work easier: Good tools are easier to use and will help you make the most of your abilities and skills. Your work will show it. Your eyes and hands are also precious tools. Take care of them. Your longevity in the jewelry making biz depends on it!
Types of Pliers Used in Making the Wrapped Loop
There are many types of pliers. For the purpose of making the wrapped loop, we will use round nosed, flat nosed, and chain nosed pliers. Bent tipped pliers and crimping pliers are useful as well.
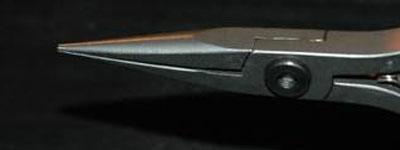
- Round Nosed Pliers: The jaws of round nosed pliers are smooth, rounded and tapered. The tips of the jaws are pointed. Some pliers have longer and wider jaws and have more pointed tips than others. Some jaws have larger gaps between the jaws than others. In the making of the wrapped loop, round nose pliers are used to grasp wire, make curves, round shapes and soft bends.
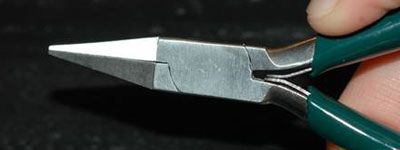
- Flat Nosed Pliers: The jaws of flat nosed pliers are smooth and flat with sharp edges. Their tips are flat and squared off. Some pliers have longer and wider jaws than others. In the making of the wrapped loop, flat nosed pliers are used to make crisp edged bends and to grip and hold the wire.
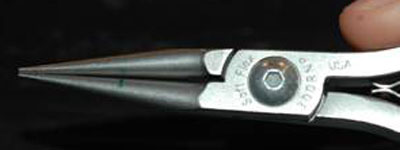
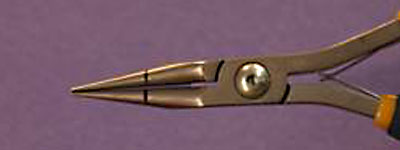
- Chain Nosed Pliers: The jaws of chain nosed pliers are flat where they bite together. The edges of the jaws are sharp. The upper and lower exterior of the jaws are rounded. The jaws get narrower toward the tips of the jaws. Some pliers have longer and wider jaws and more pointed tips than others. In the making of the wrapped loop, these pliers are used to grip and hold wire, to make bends and to burnish.
Note: Flat and chain nosed pliers are often interchangeable. Flat and chain nosed pliers are both capable of grasping wire in the same way and are therefore interchangeable for that purpose.
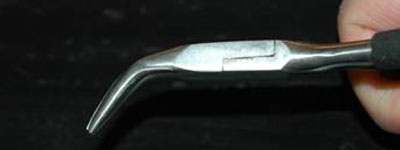
- Bent Tipped Chain Nosed Pliers: Bent tipped chain nosed pliers grip and hold wire. The tips of their jaws are angled so that they fit and can be worked into awkward spaces. The jaws and tips of these pliers can vary in their length, width and the size.
- Crimping Pliers: Crimping pliers come in various sizes and are intended for the purpose of squeezing and crimping crimp tubes and beads. For the purpose of making the wrapped loop, they are really good for smoothing out burrs and to tighten down wire ends (described later in this tutorial).
- More Info About Pliers
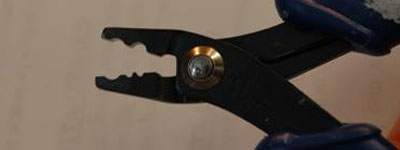
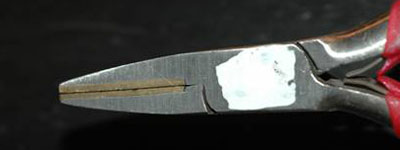
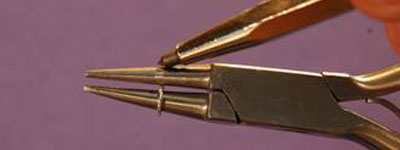
The jaws of pliers must line up:

These jaws will bend your wire in undesirable ways:

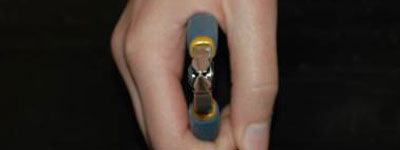
The jaws of pliers should be smooth:
Serrated jaws like these will leave undesirable marks on your wire:
The jaws of pliers can be bare metal (shown earlier), lined with brass, lined with nylon or plastic or dipped in a gel. Bare metal jaws are most common. Care must be taken to use them gently. A death grip will leave marks on metal. Brass is a fairly soft metal compared to many of the metals used in jewelry making. Therefore, brass lined jaws are less likely to mark other softer metals such as silver.
Nylon or plastic lined jaws are gentle on metal but are sometimes cumbersome to work with.
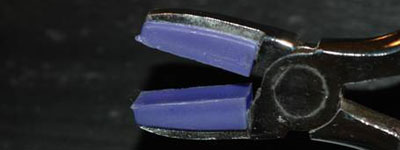
You can make your own version of nylon or plastic coated jaws by dipping the jaws in a commercially available gel marketed for this very purpose!
Important Note: Never use small pliers for heavy wire. You will have to use too much force and can damage the alignment of the jaws of the pliers. It is also hard on your hands.
Types of Cutters Used in Making the Wrapped Loop
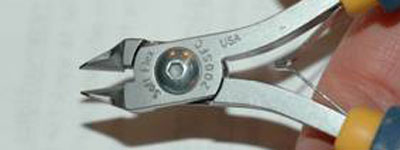
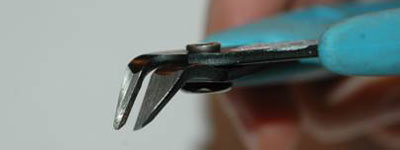
- Flush Cutters: For the purpose of making the wrapped loop, you will need a good pair of flush cutters. I use Soft Flex Professional Flush Cutters more than any other cutter. I LOVE them.
My favorite flush cutters: Soft Flex Professional Flush Cutters
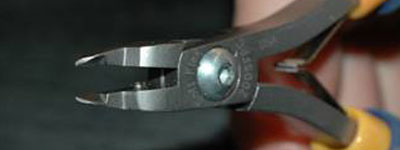


- Bent Nosed Cutters: A good pair of bent nose flush cutters are also handy. Bent nosed cutters have blades that are bent at an angle. The bend allows them to work into and cut in awkward spaces.
Important Note: Never use small cutters for heavy wire. Too much force will dull the cutting edges and damage the alignment of the blades. It is also very hard on your hands.
- More About Cutters
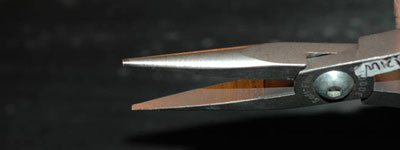
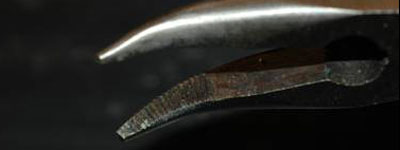
Cutters vary greatly in their size, shape, and the angle of cut they make.
The blades of the cutters must line up and be very sharp so that they will cut easily and cleanly. Dull blades require excessive force to use and will leave a burr. A burr is unsightly and can cut skin and catch hair. It is possible to smooth a burr but this means extra time and work for you.
Do not use regular cutters (unless they are designated for it) for Memory Wire or Stainless Steel Beading Wire. The wire will alter the alignment of the cutter and the blades will become damaged and dull.
Other Stuff and Where to Get It
- A Polishing Cloth: for polishing and straightening the wire.
- A Ruler
- Jeweler's Files (tiny files): for filing off sharp ends on heavy wire.
All the tools and supplies mentioned in this tutorial can be purchased through a jewelry supplier. Some tools and supplies can also be found in department stores, hardware stores and at lawn sales! Cost varies, depending on what you are buying, where you are buying, and the quality if the tool.
The Work Environment
- Make sure that you have good light and that you use magnification if needed.
- It helps to work on an organized and workable surface (use a flocked bead board, a piece of velour blanket, a towel with a short nap, or similar). This will help prevent wire and beads from rolling onto the floor.
- Your work surface and your chair should be at an appropriate height to allow you to work without stress to your neck, back or shoulders.
- Good tunes (and sometimes absolute quiet) are essential!
Choosing the Correct Wire: Quality, Weight and Durability
Quality: Your budget, taste and project will determine the quality and color of wire that you choose. There are coated and uncoated base metals and precious metals. The wire used in this tutorial is "Argenteum" silver. Argenteum is a relatively new metal on the market. It is similar to Sterling but more resistant to tarnish.
"Gauge": The diameter of most of the wire used in this tutorial is 22 gauge. The diameter of wire is referred to in terms of a gauge. Each gauge has a number. The thinner your wire is, the higher the gauge number will be. The thicker your wire is, the smaller the gauge number will be. It helps to understand gauge if you consider the following: In the beginning (after the metal has been taken from the earth and refined), it is just a lump of metal. The lump is called an ingot. The metal in the ingot will be made into wire by a process of pulling. The metal is pulled through a series of progressively smaller and smaller holes in a metal plate. With each pull, the metal wire gets thinner and finer. The gauge number represents the number of times the wire is pulled to get to that size i.e. a 22 gauge wire has to be pulled down 22 times to get that thin and fine! A 16 gauge wire needs to be pulled only 16 times to be the fat size that it is!
The selection of the gauge of wire in a project is based on several factors such as the comfort of the wearer, the design of the project and how the project will be used. Common sense tells us that delicate ear wires use a thinner, lighter wire (higher gauge number, perhaps 22 gauge), in contrast to a much abused key ring that would require a thicker, heavier wire (smaller gauge number, perhaps an 18 gauge). Another consideration is that the heavier the wire, the more costly the piece will be to make and sell. Heavier wire is harder to work with and will cause more wear and tear on your hands and tools.
Hardness: The wire used in this tutorial is half hard. "Hardness" refers to how easily a wire bends and flexes. There are variances in hardness. "Soft" ("Dead Soft") wire is very easy to bend and loses its shape easily. Soft wire is used in very small work (such as wire knitting and for wrapping a larger gauge wire). Half hard wire is the most commonly used wire in jewelry making. It is easily manipulated and holds its shape well. "Hard" wire is rarely used. It is very difficult to bend and is hard on your tools.
Work hardening: You may notice that your wire gets harder as you work it. This is referred to as "work hardening". Work hardening happens when metal has been repeatedly manipulated, handled or tumbled. Too much hardness and your piece can crack. Work hardening can be used to your advantage if you want to work with soft wire but want your finished piece to be harder.
Shape: "Round" wire is the most common shape of wire used in jewelry but there are other shapes available. We will use round wire in this tutorial.
Step by Step: THE WRAPPED LOOP
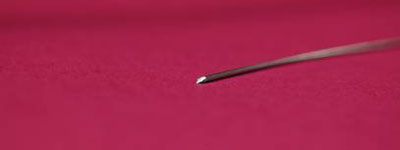
1. Straighten and Polish Your Wire
Use a set of nylon or plastic lined pliers to straighten obvious bends. Gently close the jaws of the pliers over the crook of each bend and squeeze. All wire may not need to be polished but if it does, it is easier to polish your wire before you cut it. Finish your straightening while you polish. A Polishing Cloth works best.
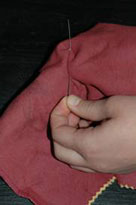
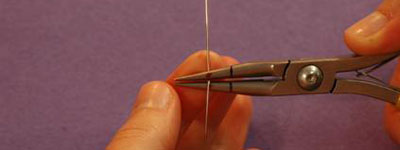
a) Simply hold your wire straight up and down.
b) With your fingers, apply pressure on the wire and cloth at the same time as you pull the wire through the cloth (from the top of the wire to bottom).
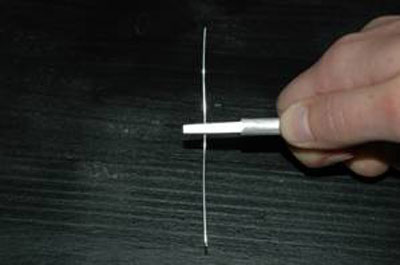
2. Measure and Cut Your Wire
Once your wire is polished and straight, estimate (or use your ruler) to measure a 3 inch length of wire.
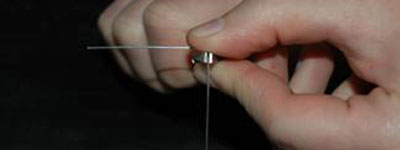
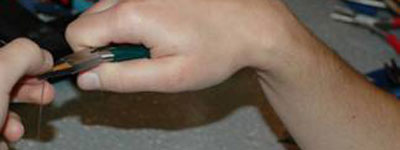
a) Put on your safety glasses.
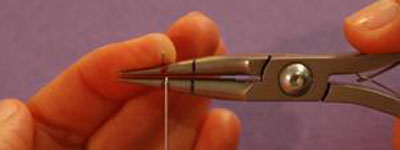
b) Place the wire between the fingers and thumb of one hand.
c) Using the pad of your thumb, apply light pressure over the piece to be cut. Make sure that you are covering the wire directly over the cutting point. (Careful, do not place your thumb so close to the blades of the cutter that you cut your skin!) If done correctly, your thumb will secure the cut piece so that it will not fly.

d) Cut several pieces, depending on how many wrapped loops you plan to make.
Options:
a) From a length of wire, spool or coil, (silver wire comes in coils or spools), measure with a ruler and cut one 3" piece of wire. Repeat each time you start a new loop.
b) From a length of wire, spool or coil, measure and cut several 3" pieces of wire in advance, so that you will have several ready to go as you need them.
c) Use a ruler to measure the first piece and then use that piece as a guide for length to cut all subsequent pieces.
d) Cut one long piece of wire (a foot in length works well) and then work off this piece, leaving the cut until you complete each loop. This approach works best when competency in wrapping loops has already been achieved. It is a time efficient manner of working and generates less waste.
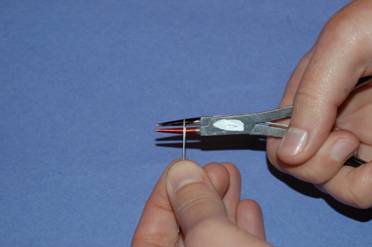
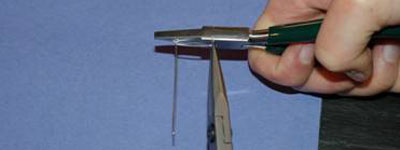
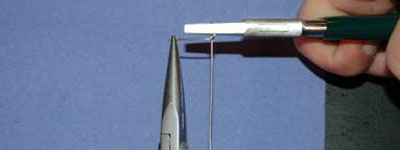
3. Make the 1st Bend
With your fingers, hold your wire vertically (up and down).
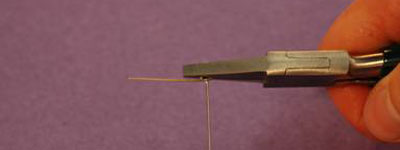
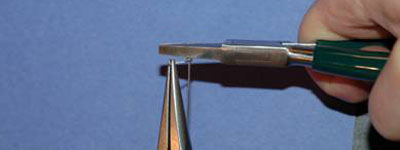
a) Use your flat nosed pliers. Make sure that the jaws of your pliers are aligned left to right in front of your body and held perpendicular to the wire.
b) Grip the wire half way down from the top of the wire. An adequate length of wire at the top and bottom of the bend will be necessary for completion of the wrapped loop.
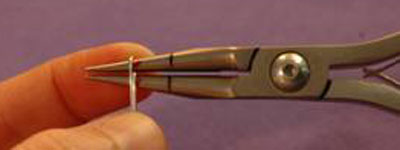
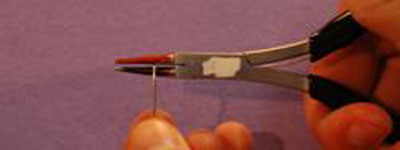
Wire held with pliers held correctly: perpendicular to the jaw:
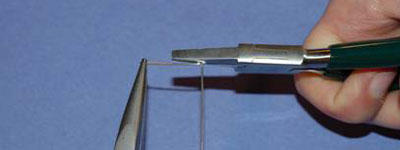
Wire held incorrectly ... the pliers are at an angle to the jaws (This is an extreme
example, but even a subtle angle can make a difference in your loop).

c) Next, using the pad of your thumb (on your free hand) for leverage, press the top wire down at the exact point where it emerges from the top of the jaws of the pliers.
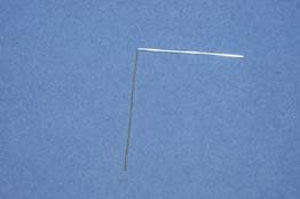
d) Press the wire down until the wire forms a 90 bend (right angle). The jaws of the tool should be aligned left to right in front of your body and the top wire should be pointing away from you. The bottom wire should be pointing straight down.

When you are finished, you should have a nice crisp bend.
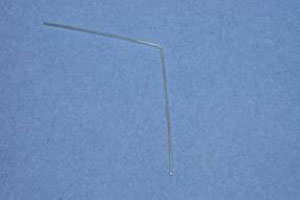
This photo shows an incomplete bend. The wire was not pressed
down far enough over the top jaw of the pliers.
Keep a neutral wrist. Be aware of wrist strain.

This photo shows a cocked and strained wrist.
Of course, be aware of your sitting position.
Try to sit straight and relaxed and take frequent breaks!
e) Remove the flat nosed pliers and set them aside.
Option: Some tutorials suggest that round nosed pliers rather than the flat nosed pliers be used to make the bend.
Compare bends made with the two pliers:
Left (round nosed), Right (flat nosed)
My observation is that when a thinner (higher gauge number) wire is used, that a sharp bend is not as noticeable or necessary, therefore, the round nosed pliers work well, and are even preferable (less juggling of tools).
BUT,... the larger the bend and the heavier (lower gauge number) wire that is used, the greater the importance is to get a nice, crisp bend that can only be made with the flat nosed pliers.
4. Determining the Size of Your Loop
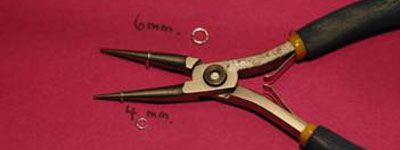
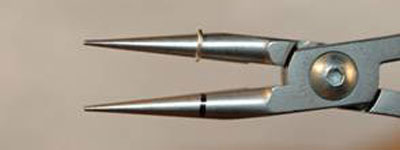
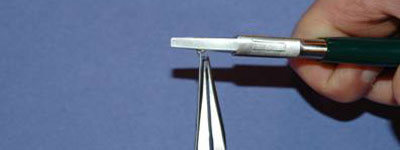
a) Use your round nosed pliers. Look at the jaws of your pliers. Notice how the diameter of the jaw tips start out small and get bigger towards the joint.
b) Insert your wire at any point in between the jaws of the pliers and clamp down gently. (You will be holding the wire in the same position that it was when the 90 degree bend was made.)
c) Look at the place where the wire is located on the jaw. Decide if the jaw size at this point will allow you to make the size loop that you want (or if you should move the wire to a spot where the loop can be made bigger or smaller). Remember, pliers come in different sizes. Some may or may not be capable of making the size loop you desire.
- To make a very small loop (such as a 4 mm size loop), you would move the wire closer to the tips of the pliers, where the jaws are narrower.
- To make a larger size loop, (such as a 6 mm loop) you would move the wire closer to joint of the pliers, where the jaws are wider.
d) Once you have determined where to place the wire on the jaw, mark that spot!
Helpful Hint: It can be difficult to find the exact spot that you should place your wire to get the size loop that you want.
You might try this:
a) Use a jump ring that has a hole with the same size circumference as the loop that you want to make (we will use a 6 mm jump ring). Slide the jump ring as far as it will go onto the upper jaw of the pliers.
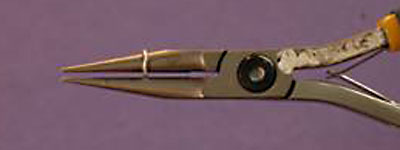
b) Make a mark on the opposite jaw of the pliers opposite the jump ring.
c) Remove the jump ring and make a mark directly opposite your first mark.
d) You can now reference the marks to make loops that are consistently 6mm in diameter!
- For a temporary mark, you could use nail polish or a permanent ink marker. (These marks will wear off over time or can also be removed with nail polish remover or fine steel wool.)
- For a permanent mark, you can use a file/scribe.
Helpful Hint: Think ahead for times when you might want to make a variety of sizes:
- You could make several marks on the same set of pliers, one for each size loop.
- You could have several sets of pliers, each marked for a different size loop!
Why is the Size of the Loop so Important?
The size of the wrapped loop affects the final appearance and strength of a piece.
- Large loops can overwhelm tiny beads.
- Tiny loops may not support large beads.
- Many jewelry pieces require same size loops so that they will hang evenly and be balanced for function as well as appearance. A set of earrings must have identical loops or one will hang lower than the other. An odd size wrapped loop link in a chain will stand out like a sore thumb.
The size of the loop must be durable i.e. the size of the loop must correspond with the ability of the wire to support and maintain that size.
- A loop that uses wire that is too soft or too thin for its size (ex. a large loop using fine wire) will be weak. It will eventually lose its shape with only minor wear and tear.
This loop is already losing its shape:

5. (Part A) Starting the Loop
You are going to make the first side of the loop.
a) Hold the wire with your fingers in the same position that you were when the 90 degree bend was made.
b) Insert the bottom jaw of the round nosed pliers into the crook of the wire.
c) Align the wire with the designated marks on the jaws of your pliers (which mark the size loop you want to make).
d) Close the top jaw. The jaws of the tool should be aligned right to left in front of you and the top wire should be pointing away from you.
e) The top piece of the wire should be pointing away from you.
f) The bottom piece of the wire should point straight down. Like this:

Roll the jaws of the pliers very slightly over the bend towards your body.

Do NOT start off correctly but then ... accidentally slip
away from the bend in the wire.

If you do, your loop will end up distorted.

g) Next, use the pad of your forefinger to begin to push the base and length of the "Tail" of the wire from behind, over the top jaw of the pliers towards you. Stay on the mark. Mantra ... Stay on the mark ... Stay on the mark ... Stay on the mark.
h) Continue to move the wire straight up and over the top jaw of the pliers, towards you. Stay on the mark.
i) Continue the movement by using the pad of your forefinger to press the top of the bend down firmly over the top of the pliers. Stay on the mark.
j) Continue using the pad of your forefinger to support the back of the wire but now use the pad of your thumb to press the wire over the rest of the way so that both ends are parallel to each other. Stay on the mark. DO NOT REMOVE YOUR PLIERS.
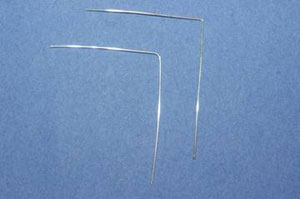
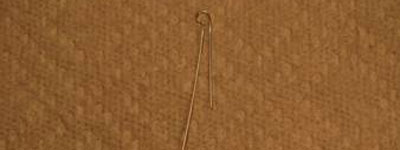
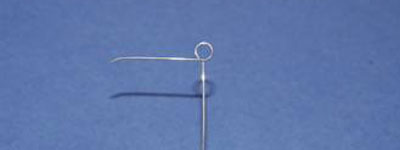
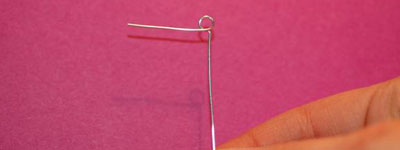
Do not remove your wire ... but if you did, your wire would
look something like a cotter pin, or bobby pin!
5. (Part B) Starting the Loop
You are going to make the other side of the loop.
a) Now the top jaw is inside the bent piece of wire. DO NOT remove your pliers.
b) With your free hand, hold onto the cut ends of the wire. Stabilize the wire while you rotate the jaw that is inside the wire (loosen the jaws of the pliers slightly to allow you to do this). You will reverse the jaws. The bottom jaw will come up from behind the wire until it sits on top of the wire.
- The jaws will reverse easily if you are rotating in the correct direction.
- If you try to rotate in the wrong direction, the wire will block the bottom jaw from moving.
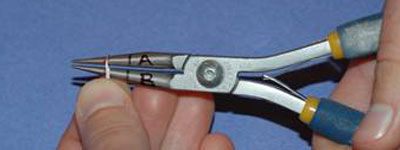
Helpful Hint: You might want to label your jaws in a way that will help you until you master the movement.
Jaws labeled A and B: Starting position:
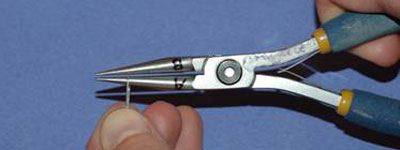
Jaws labeled B and A: "A" jaw rotates inside the wire, and
"B" jaw moves from behind to the top: Ending position.
Jaws colored red and black: Starting position.
Black jaw rotates inside the wire, and Red jaw comes from
behind to the top of the wire: Ending position.
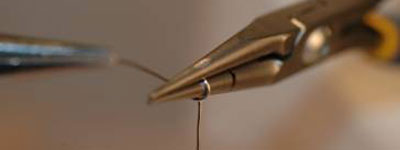
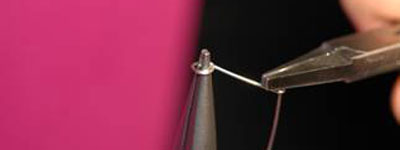
6. Forming the Loop
a) Make sure that you hold your round nosed pliers in place.
b) Then, with your flat (or chain) nosed pliers, grab the tip of the "tail" again.
c) Pull the tail away from you. Make sure that you stay on the mark.
d) Pull the wire tight under the jaws of the pliers.
Note: Some tutorials suggest using the fingers rather than a tool for manipulating the tail wire to wrap it around the base wire. My experience has been that using the fingers for fine and soft wire can be effective but with most wire, using a tool is much easier and there is much less strain on the fingers.
Pulling the wire tight under the jaws of the pliers:
The tail wire should cross directly in front of (not behind) the base wire and directly under the jaw of the round nosed pliers. (You can graze the bottom jaw of the pliers with the wire as you cross!)
HINT:
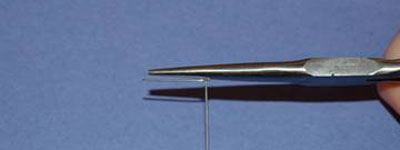
a) Look at the wire from the end of the pliers.
b) Check to make sure that the circle that you are making is round and centered.
c) If not, you can adjust at this point by continuing to hold onto the wire while rocking the jaws of the pliers to tighten or loosen the circle as needed.
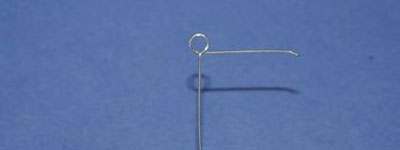
This is the view you would see if you moved pliers so that the tips were pointing toward you:

This photo shows the front of the loop when it is removed from the pliers:
IMPORTANT: Have you noticed a pattern?
a) The tool is always perpendicular to the supporting wire
b) The supporting wire is always on its mark.
This photo shows a wire that has slightly shifted off its mark and has moved closer
to the tips of the jaws. The wire undershoots and misses its connection.

This is how the loop would look when it is removed from the tool:
Make sure that you do not bend the wire at the neck. This is how the loop would look
if it had been bent backwards. This happens when the tips of the jaws are tilted
up rather than perpendicular to the wire.

If you hold your pliers perpendicular to the wire it holds AND stay on the mark, this is the loop that you will get:
This is the front of the loop:

This is the back of the loop:
Option: As previously noted, many tutorials suggest using the round nosed pliers rather than the flat (or chain) nosed pliers. The crisp bend, made by flat (or chain) nosed pliers, provides a more clearly defined reference for the beginning and ending point for the closure of the loop. A softer bend makes the closure point of the loop less obvious. Closing the loop can be more difficult. The definition of the closure point is less relevant with finer wire and smaller loops.
7. Tidy Up the Loop
We are striving to make a perfectly round loop that is perfectly centered directly over the base wire.
You may notice that although you have done everything correctly, the wire has missed the connection point of the loop very slightly!
Do not fret.
The reason for this is that the jaws of the round nosed pliers taper (some more radically then others). The wire loop will naturally get smaller as it wraps around and accommodates the narrowing of the jaws. Consequently, the loop can be off round unless some adjustment is made in the course of making the loop.
To remedy the slight inconsistency caused by the tapering of the pliers:
a) Once you have crossed over with the tail wire and formed your loop, do not let go. Continue to grip the wire with the jaws of the pliers.
b) Then..while gripping the wire, rock the jaws of the pliers slightly forward (closer to yourself).
c) Look at the loop from the side as you do this. If you tighten the loop too much, simply rock the pliers away from yourself.
d) You will see the loop close tighter or loosen up until the loop becomes complete.
Hint: This is also an effective technique to resolve the off set loop that happens due to the wire slipping off the mark!
This step will become easier and easier for you as you practice. You will find that forming the loop and tidying it up will all become one smooth movement!
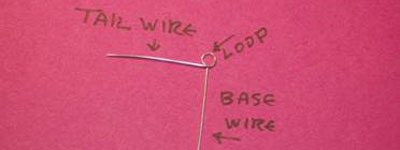
Now we will give names to the parts of the loop that you have made thus far:
- You have made the "Tail" wire. This is the piece of wire that you will be bending, wrapping and cutting.
- You have established the "Base" wire. This is the piece of wire that hangs straight up and down.
- And you have made the "Loop"!
These are not the only labels given to the parts of the wrapped loop. Some tutorials give different names. The names vary but the meaning is the same. What is important is their role as a reference.
8. Adding a Charm, Link or Other Finding
If there are one or more items that need to be added to the wrapped loop, such as a charm or link, this is the point at which the connection would be made.
a) Close the tips of jaws of the pliers over the right side of the loop.
b) Using the pad of your forefinger to assist, open the loop slightly ever so gently, with your flat nosed pliers.
c) Open the loop no more than what is necessary to allow for the connecting loop of the charm (or finding) to slide through.
d) Slip the charm (or whatever) over the tail wire, through the opening and into the loop that you have just made. Remember to support the loop with your fingers while you do this so that it does not bend out of shape.

e) Close the loop by simply reversing step a).
9. The First Wrap
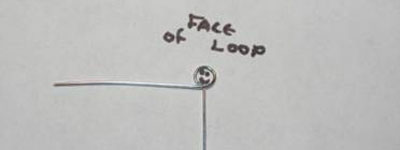
We have already given names to the parts of the wire called the Tail, the Base and the Loop. Now we will refer to the "Face", the "Neck" and the "Wraps".
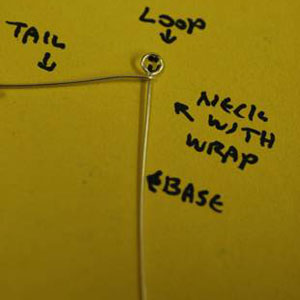
The "Face" is the open part of the loop.
- The 'Neck" is the top of the base wire, directly under the face (the loop).
- In this step, you will be wrapping the tail wire around the top of the neck. Each time the wire encircles the neck it is called a "Wrap".
a) Before you begin the first wrap, you should have a perfect loop that is perfectly centered over the base wire. Any additions to the loop must have already been made. The tail wire may need to be adjusted. It must straight and be perpendicular to the base wire.
b) Using your fingers, hold the wire from the bottom of the base wire, straight up and down with the face of the loop exposed.
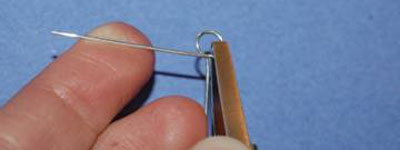
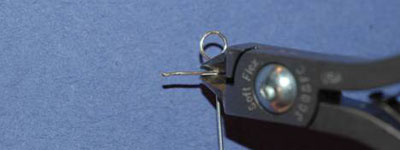
c) Place the jaws of your flat (or chain) nosed pliers over the face of the loop, just above the neck. This will stabilize and secure the loop while you wrap the neck. Hint: My personal preference is to use chain nosed pliers that have extra long jaws for this step. This way, there are no joints or handles to obstruct my movement.
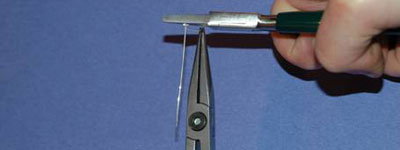
Using extra long chain nosed pliers:
Using standard flat nosed pliers:
Make sure that you place the jaws of your chain (or flat) nosed pliers over the face of the loop and NOT THROUGH the loop.
d) Hold your pliers (and loop) firmly (but not in a death grip). Let go with the hand that has been supporting the wire.
e) Using your free hand, pick up your chain (or flat) nosed pliers (which ever pair you are NOT using to hold the loop).
f) Using the tips of your chain (or flat) nosed pliers, grasp the tip of the tail wire from behind the piece.
g) Starting from behind the entire piece, bring the wire half way around the neck of the base wire. Remember: Use your tool, not your fingers to bring the wire around.
Grasping the wire:
Keep the wire up TIGHT and LEVEL against the bottom loop. Do not angle the wire.
The outcome will set the stage for subsequent wraps to be level and tight.
Bring the wire from behind:
The wire is coming around from the back:
Half way around:
h) Let go of the wire just before the wire starts to wrap around the jaw of your pliers.
Note: If you do not let go of your wire to reposition your pliers, you will find that the jaws of your pliers will get wrapped up in the tail wire like a cocoon!
i) Re-position your pliers. Once you re-position your pliers, you will work from the front to pull the wire from the side to then completely surround the neck. You will finish in the position where you first started.
Here are some examples of poorly executed wrapped loops:
This is a tear drop shaped loop with gaps between the wraps:

- You are more likely to end up with a tear drop shaped loop if the bend in the first step of making the wrapped loop is made with round nosed pliers rather than the flat nosed pliers. The reason is that the connecting point for the loop is soft rather than defined.
- Another reason for the loop being tear drop shape, rather than round is that the wire was not pulled tight enough across the chin of the loop in the beginning of the first wrap. This often happens when the wire is pulled with fingers rather than a tool.
THE ONLY PART OF AN ANGLED LAST WRAP THAT WILL SIT FLUSH ON THE BEAD WILL BE THE CUT END (TIP).
This is a tear drop shaped loop with wraps that will not connect well with the bead. Not only are the wraps angled, it also has a dangerous uncut wire tip:
Front
Back
- The wire in the loop missed its connection and therefore was out of round (i.e. tear drop shaped).
- The tear drop shape of the loop set the stage for subsequent wraps to be angled (rather than level) wraps.
- Because the first wire wrap was at an angle, the last wrap is at an angle.
- The fact that the wraps are tight and even cannot correct the problem.
- Thus, the ONLY part of the wrap that meets the bead hole WILL BE THE VERY TIP OF THE LAST WRAP!!!
- The connection to the bead is weak and more likely to bend at the point between the bead and the last wrap.
Here is a photo of another tear drop shaped loop:
The gaps between the wraps are unattractive and will be weakest at the point of the loop.
- As previously illustrated, a round loop sets the stage for a straight and level first wrap.
- When the first wrap is straight and level, the last wrap should be straight and level.
- Thus, the MAJORITY OF THE LAST WRAP THEN WILL SIT FLUSH ON A BEAD. (Not ALL of the last wrap will sit on the bead, because the last wrap is a spiraling coil, not a ring).
- The connection to the bead is secure.
Remember that this first wrap sets the stage for all subsequent loops!
If the first wrap is not straight or tight up against the bottom of the loop, you must correct it.
What to do? Cinch it up!
1) Place the jaws of the flat (or chain) nosed pliers across the face of the loop, barely above where the first wrap crosses the neck. The jaws will protect the loop from collapsing in the next step
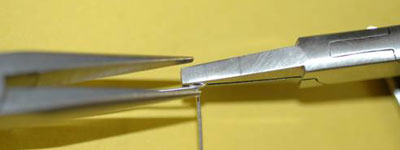
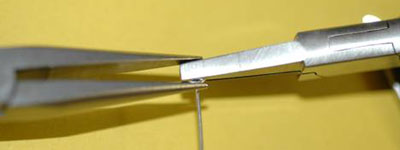
2) Use the flat (or chain) nosed pliers,
3) Hold these pliers opposite but parallel to the jaws of the pliers that are closed over the face of the loop.
4) Open the jaws.
- Place the bottom jaw under the lip of the first wrap.
- Place the top jaw of the pliers on top of the upper jaw of the holding pliers.
- Tighten the jaws slightly, straightening and cinching up the loop as you do so.
- It doesn't hurt to do this every time. It ALWAYS makes your first wrap into a nice level base for subsequent wraps.
A complete wrap starts away from you and ends away from you. If you have done this correctly, your first wrap is level, tight and snug up against the bottom of the loop. It will serve as a guide for all subsequent loops.

10. How Many Wraps?
The wrapped loop usually consists of 1 to 3 wraps.
To complete a second, third etc. wrap:
a) First, make sure that the first wrap is level, tight and snug up against the bottom of the loop.
b) Repeat the step that you have used to make the first loop. Make each subsequent wrap straight, tight, and snug up against the previous wrap.
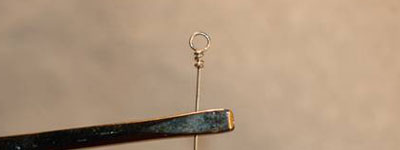
Nice straight, tight and snug wraps!

Some loops have several wraps!! A length of wraps can be an awesome design element! But keep in mind that:
- The greater the length of the wrapped loop, the more vulnerable it is to bending.
- Inconsistencies in wrapping are always more evident with the greater the number of wraps.
11. The Final Cut
The final cut is the definitive act. It can be the fatal flaw in an otherwise perfect wrapped loop or the perfecting touch, depending on how well you execute it.
Making the Generic Cut:
a) Use the safe cutting practices described earlier in this tutorial.
b) Support the loop and neck from behind with your forefinger.
c) Place the cutters, as close as you can to being perpendicular to the length of the base wire as you can. The flat side of the blades should be against the wire.
d) Press the open tips of the blades down, (almost like laying the blades down parallel along the last wrap) but angle the tips slightly inward to allow them to cut.

Do not cut the wire straight across the wire. It will make too much of
a blunt ended cut. You want to cut a nice bevel (angled cut).
This approach to cutting is incorrect.
e) Place your thumb over the wire while your forefinger(s) supports the wire from behind.
f) Make the cut.
g) A good set of cutters should cut closely and smoothly. But if for some reason, your cut did not turn out quite right, you must correct it. A sharp edge or burr can cut skin and catch hair and clothing.
To remedy this situation:
- If the end of the cut wire sticks out, and there is enough wire left, you can re-cut the wire. Cut it closer and at a sharper angle.
- If the end of the cut wire sticks out and there is NOT enough wire left to re-cut, then you must do one or both of these two things:
1) If the end of the cut wire sticks out, gently press it down with the tips of your chain nosed pliers. Then burnish.
2) If the end of the cut wire is flush but still rough, then burnishing is all that is required.
Burnishing
Burnishing is a kind of polishing. Tools that are made of steel are harder than any precious metal such as silver. If smooth steel is rubbed against the rough surface of a precious metal such as silver, it will smooth and polish it out.
Burnishing with the tips of the chain nosed pliers
- Simply support the wire with your fingers.
- Gently rub the tips of the chain nosed pliers back and forth around the end of the wrap.
Note: Do not squeeze too hard. The tips of the pliers can slip off and damage your wraps.
Here the wire is being burnished with the tips of the chain nosed pliers:

A set of crimping pliers is very handy for burnishing.
Burnishing with a set of crimping pliers
- Support the loop by holding the neck with your fingers.
- Place the entire cut wrap inside the hole closest to the tip of your crimping tool.

- Gently rotate the tool back and forth, gently rubbing the edges of the hole over the rough cut. The burnishing action will smooth out the sharp edge or burr.
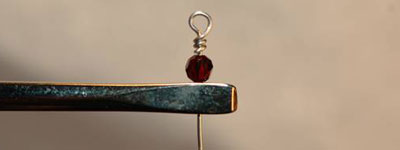
That's It!
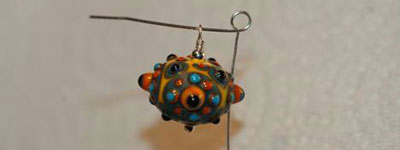
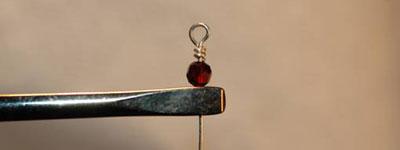
Enlarged photo of a crystal bead with multiple wraps:
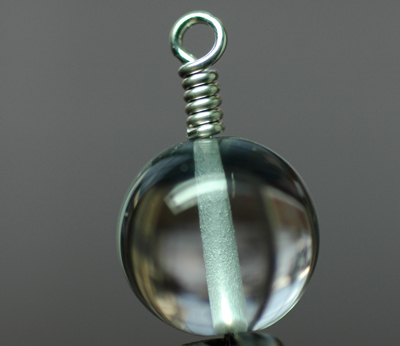
DONE! Bent, Looped, Wrapped, Cut and Burnished!!!
We have finished the simple wrapped loop. Yahoo! Cheers! Clap! Clap!
What Next?
There are so many uses for the wrapped loop ... as a component, to connect components, to secure our beads .. So much jewelry to make .. and so little time.
And yes, there is more. Once we have mastered the wrapped loop, we can look at the subtleties of connections. How do we make adjustments for the variety of surface shapes that we must accommodate?
This will be a subject for the future. In the meantime, keep your pliers straight, your wire in line, stay on the mark and have fun!
Join our Facebook group – VIB. Stay in the know. Stay up to date. From our bead shows to our video shows and sales, you can stay in touch with us. The community is full of artistic and helpful beaders and crafty people. Inspire and be inspired. Share your pictures and get the beading bug from others!
Visit the Soft Flex Company YouTube Channel!


Michele Benson is the owner of the Cuttlefish Glass Studio in Klamath Falls, Oregon, where she teaches Lampwork (beadmaking) and jewelry making. She obtained her Bachelor of Arts Degree in Studio Art from Potsdam State College in New York and is a member of the ISGB. Michele credits her husband, Dan, and her students as being her greatest motivators and inspiration.