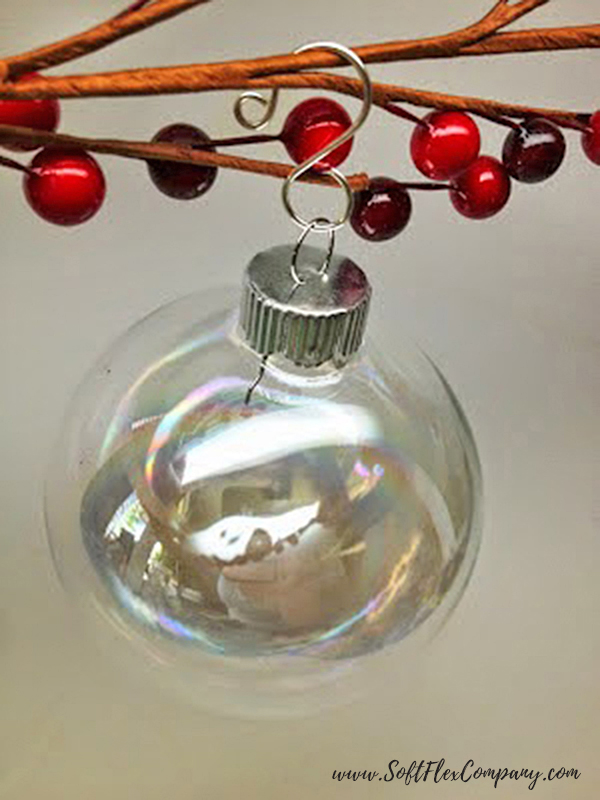
It’s the most wonderful time of the year! The days are full of sweet moments. There is urgency and shopping. Friendships are easier and we are kinder toward strangers. There is a bigger sense of community at the end of the year. We have all made it through another year and can enjoy family and a little down time.
I find myself full of creativity this time of the year. Personal decorations are so much more amazing than store bought garlands. I love making my own ornaments. A little creativity goes a long way. Beaded or braided, wire or cord – there are no rules and your work can be extravagant or simple. That personal touch can be captivating when visitors see your tree.
Don't miss our other holiday jewelry and ornament ideas. Follow our blog and check out our Free Beading Project Ideas. Subscribe to our YouTube channel for more tips. Visit our Facebook page if you want to catch our live shows and sales. And join our Facebook group – VIB, if you want to join a friendly community or jewelry designers and all around creative people. We would love to see your holiday creations. Post pictures on our VIB group!
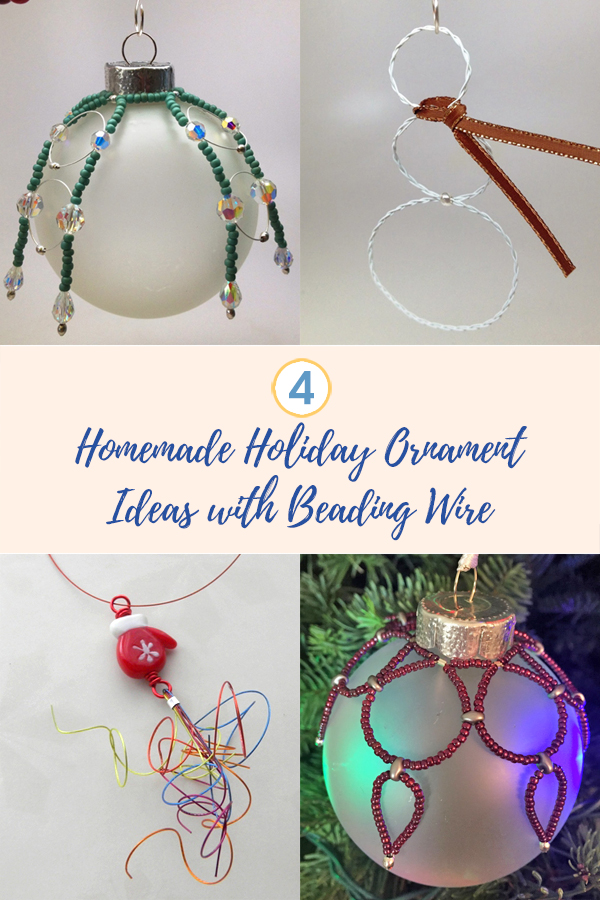
Ornament Hanger
In our previous blog, we featured instructions on how to create a homemade ornament hanger. Creating your own ornament hangers is a great way to truly personalize your Christmas decorations. We offer one way to do it, but you can change the look to fit your style. Click the image above to view the blog with those instructions.
Beaded Holiday Ornament Cover
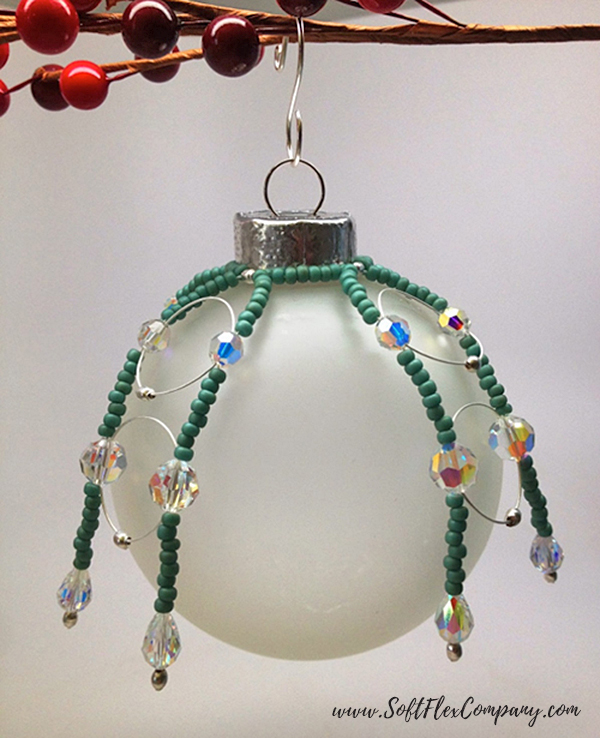
Designer Sara Oehler
Materials
Soft Flex Extreme Beading Wire, .019 Diameter - 6 1/3 feet
2x2mm Crimp Tubes - 20 pcs
3mm Crimp Covers - 20 pcs
8/0 Seed Beads - 168 pcs
6mm Crystal Beads - 8 pcs
8mm Crystal Beads - 8 pcs
Tear Drop Crystal Beads - 8 pcs
3 1/2" Ornament
Tools
Crimping Pliers
Chain Nose Pliers
Cutters
Bead Stoppers
Instructions
Notes:
Although many of the pictures in progress show the ornament cover on the ornament. I put this together on a flat surface and simply slid it onto the ornament for pictures.
Ornaments don't all have the same sized topper. Make sure that your initial loop fits on your ornament before moving forward. You may consider adding another seed bead to each section to make it bigger or take one away to make it smaller.
Leave a little slack whenever you crimp to make room for the crimp covers and to allow the wire to relax. Don't cinch the wire down too much.
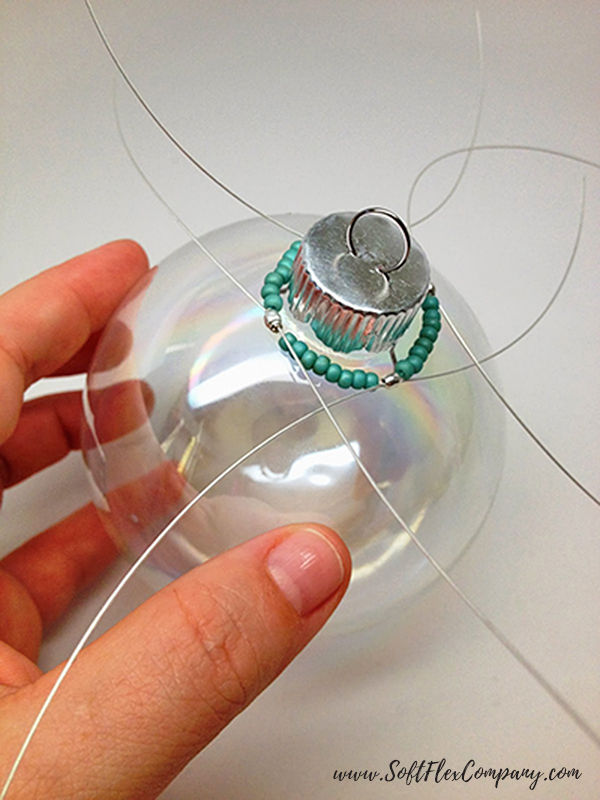
Step 1: Use 12 inches of beading wire to string a crimp tube and 8 seed beads. Repeat the stringing pattern 3 times. Pass the wire through the first crimp to create a circle, in the middle of the wire. Leave a little slack in the circle, clip a bead stopper on each wire.
Step 2: String 8 inches of beading wire through each crimp tube except the first. Adjust the crimp to the middle of the wire and crimp the tube. Repeat for the other 3 crimps, cinching the circle so that there is only a little slack. Cover every crimp with a crimp cover.
Click here for crimping instructions.
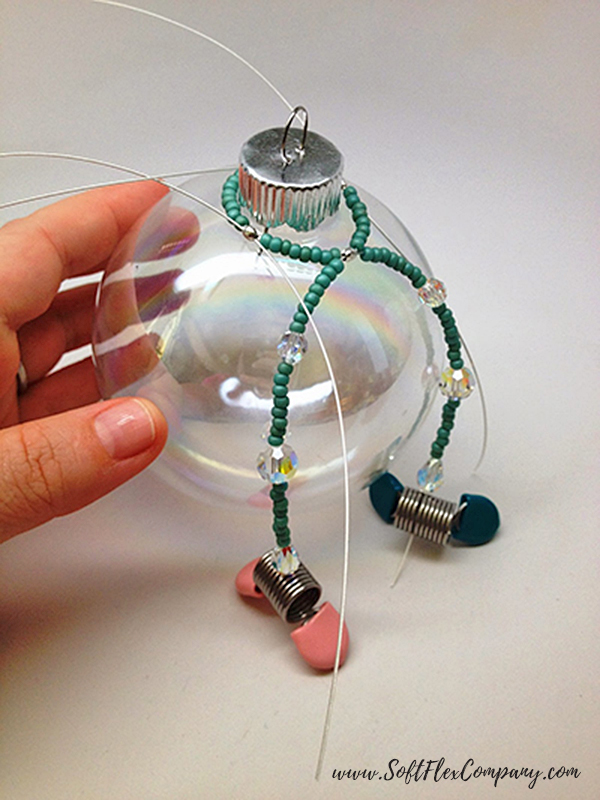
Step 3: Choose one wire and string 8 seed beads, a 6mm crystal, 8 seed beads, an 8mm crystal, 8 seed beads, a tear drop crystal and a crimp tube. Clip a bead stopper on the end of the wire. Repeat the stringing pattern on the next wire.
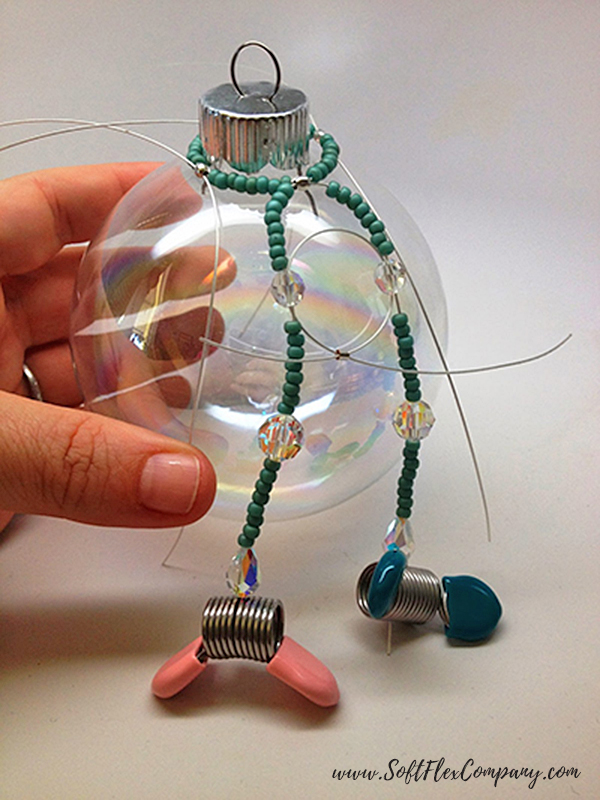
Step 4: Use a 5 inch piece of beading wire to string through the 6mm crystal in both wires. String a crimp tube and pass the other end of the wire through the crimp in the opposite direction to create a 20mm circle. Crimp and cover the crimp with a crimp cover. Trim excess wire.
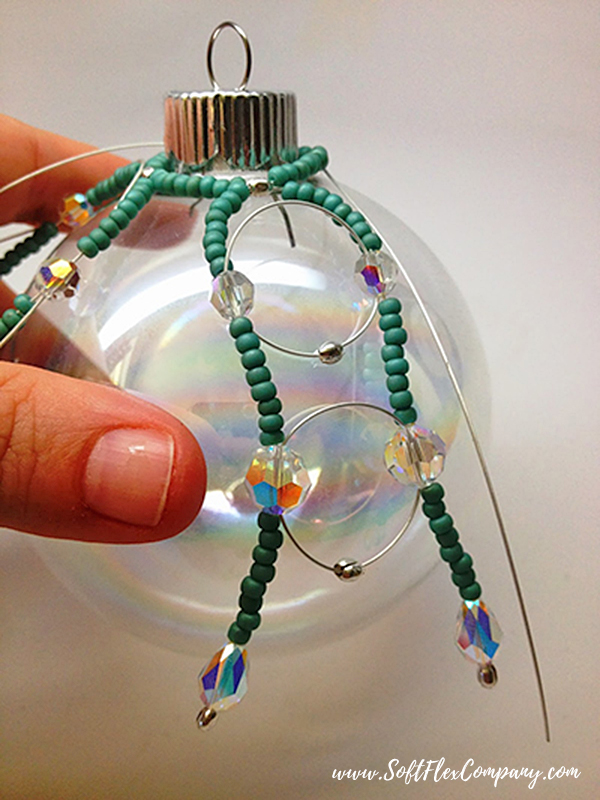
Step 5: Repeat Step 4 to connect the two 8mm crystal beads in the same way.
Step 6: Remove the bead stopper from the bottom of the wire strand. Cinch the wire down and crimp. Cover the crimp with a cover. Trim excess wire.
Step 7: Repeat Step 6 for the second strand.
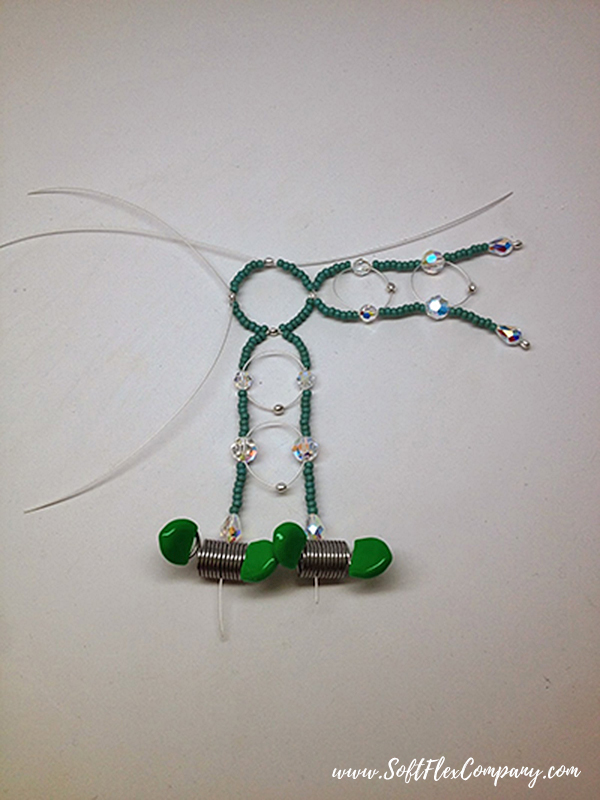
Step 8: Repeat Steps 3-7 for the other three sides of the ornament.
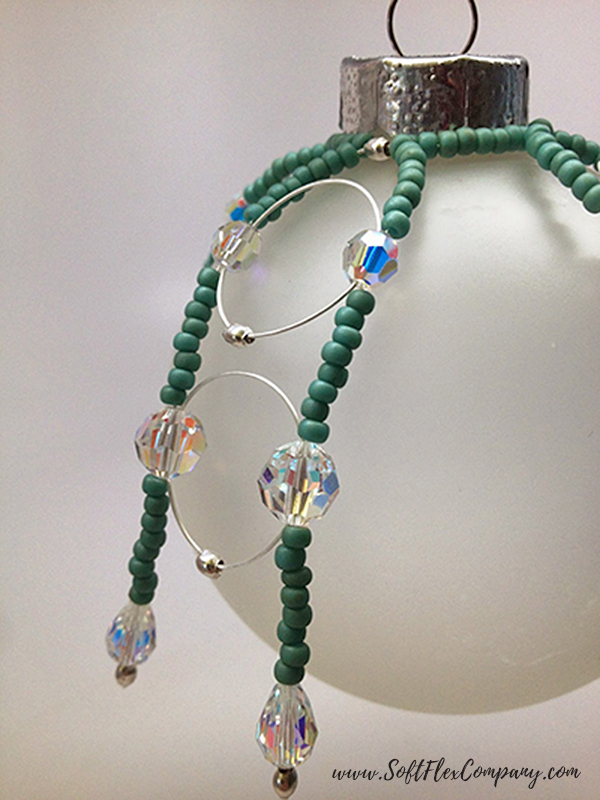
Step 9: Slide the ornament cover on your ornament.
DIY: Free Beaded Holiday Ornament Using Soft Touch Flexible Beading Wire Pattern
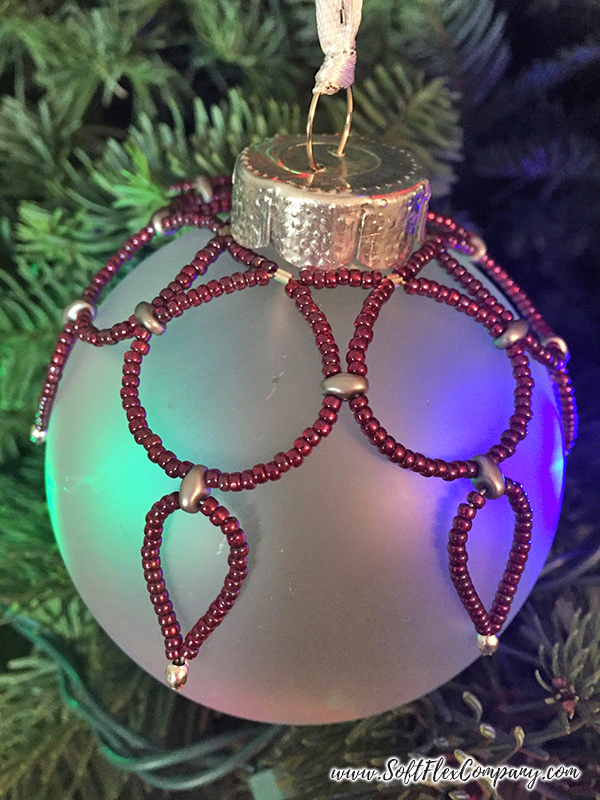
Designer Sara Oehler
Do you ever look at beaded ornaments and feel like they may be too difficult for you? I do. So, I created a pattern that looks far more complicated than it actually is. No bead weaving necessary! It is super easy, I promise!
Materials
Soft Touch Beading Wire, .019 Diameter - 54 inches
2x2mm Crimp Tube - 12 tubes
3mm Crimp Covers - 12 covers
Super Duo Beads - 12 beads
11/0 Seed Beads
(Beads were purchased from
www.BeadWorldInc.com)
Tools
Crimping pliers
Chain nose pliers
Bead stoppers
Cutters
Instructions
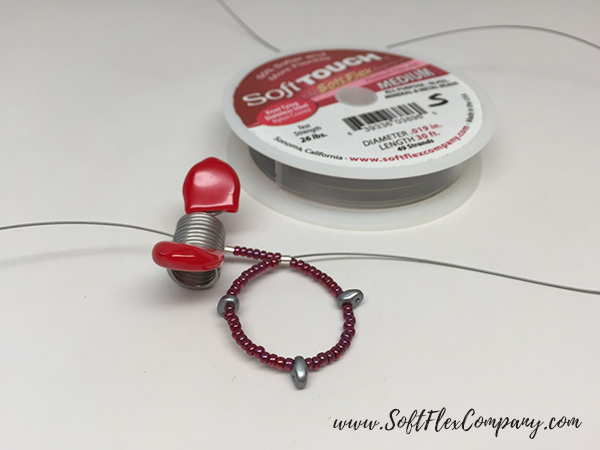
Step 1: Attach a bead stopper a few inches from the end of 30 inches of beading wire. String a crimp tube, seven beads, a crimp tube, ten beads, a Super Duo bead, thirteen beads, a Super Duo bead, thirteen beads, a Super Duo bead, ten beads. Pass the wire back through the second crimp tube to create a circle.
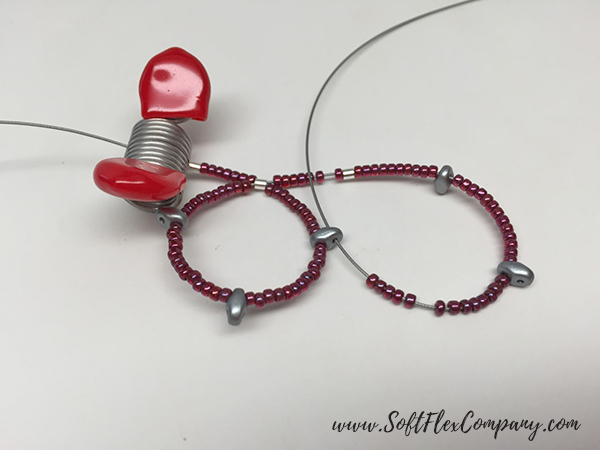
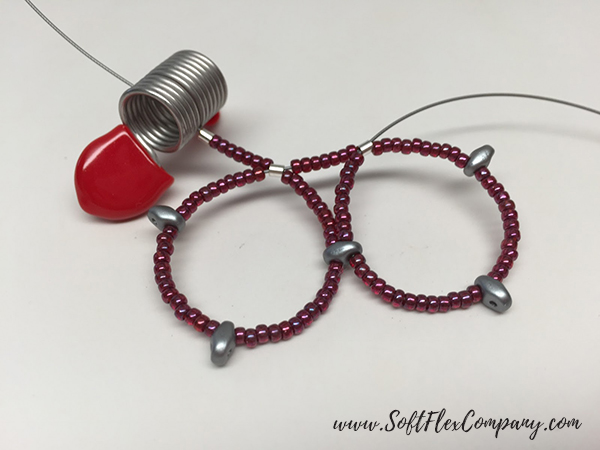
Step 2: String seven beads, a crimp tube, ten beads, a Super Duo bead, thirteen beads, a Super Duo bead, thirteen beads. Pass the wire through the second half of the first Super Duo bead in the previous ring. This will connect the two rings together. String ten beads. Pass the wire back through the crimp tube to create a circle.
Step 3: Repeat Step 2 three times.
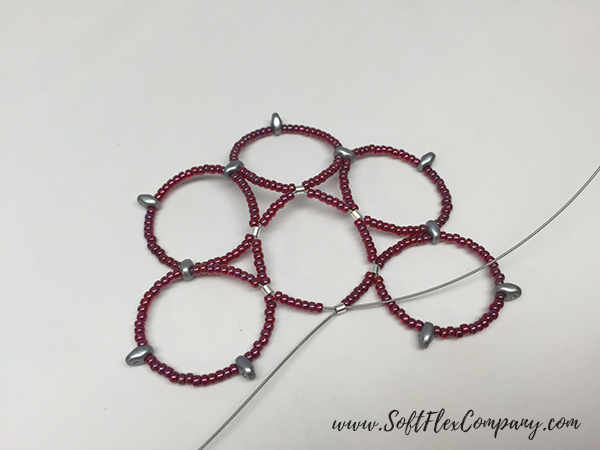
Step 4: String seven beads. Pass the wire through the very first crimp to connect the two sides. String ten beads. Pass the wire through the second half of a Super Duo bead. String thirteen beads, a Super Duo bead and thirteen beads. Pass the wire through the second half of a Super Duo bead. String ten beads. Pass the wire back through the crimp tube, creating the final circle.
Step 5: Crimp all of the tubes.
Click here for crimping instructions.
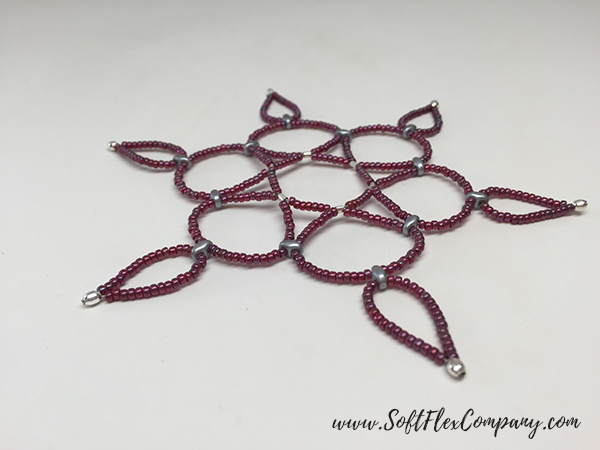
Step 6: Attach a bead stopper at the end of 4 inches of beading wire. String sixteen beads. Pass through the second half of a Super Duo bead at the bottom of a circle. String sixteen beads. Remove the bead stopper. Using both ends of the wire, string a 2x2mm crimp tube, creating a tear drop shape. Crimp the tube. Cover the crimp. Trim the excess wire.
Step 7: Repeat Step 7 five times to complete the ornament cover.
Get creative and try a color variation.
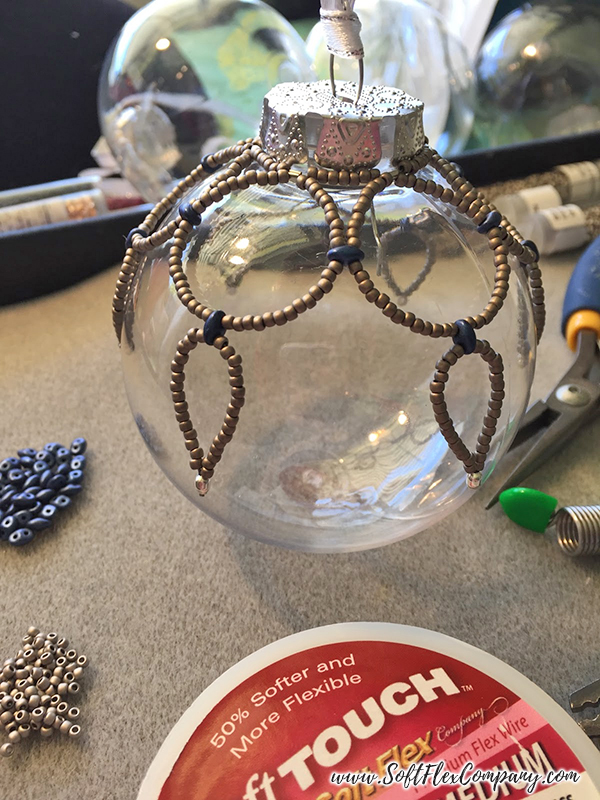
I hope that you enjoy the ornament tutorial. If you learn better via video, you can check out a
video replay from a live video that I shot on how to make this ornament in our Facebook Videos. While you are there, please click to "like" us on Facebook. We offer new videos regularly!
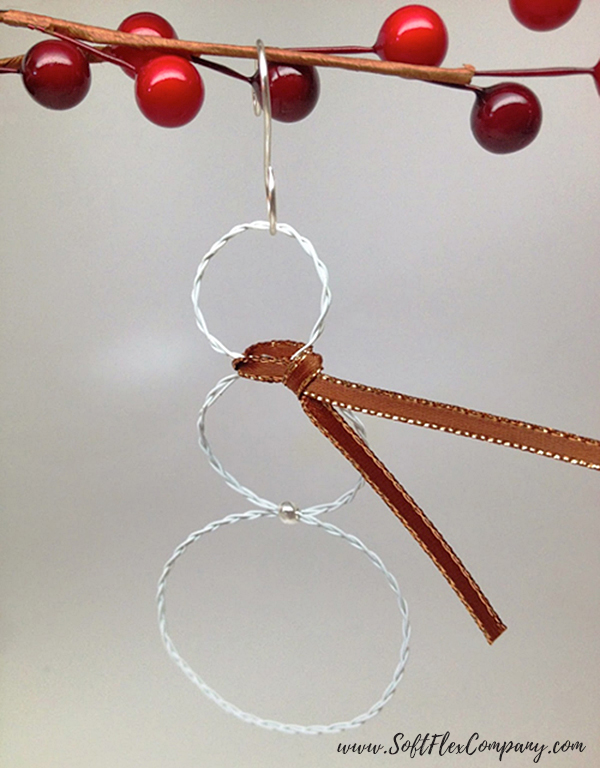
Simple Braided Wire Snowman Ornament
Designer Sara Oehler
Materials
Econoflex Wire, Snow White Color, .019 Diameter
3x3mm Crimp Tubes - 2 pcs
4mm Crimp Covers - 2 pcs
Ribbon
Tools
Mighty Crimping Pliers
Chain Nose Pliers
Cutters
Bead Stoppers
Instructions
Step 1: Clip a bead stopper on one end of three strands of Econoflex wire and then braid the wires for 14 inches.
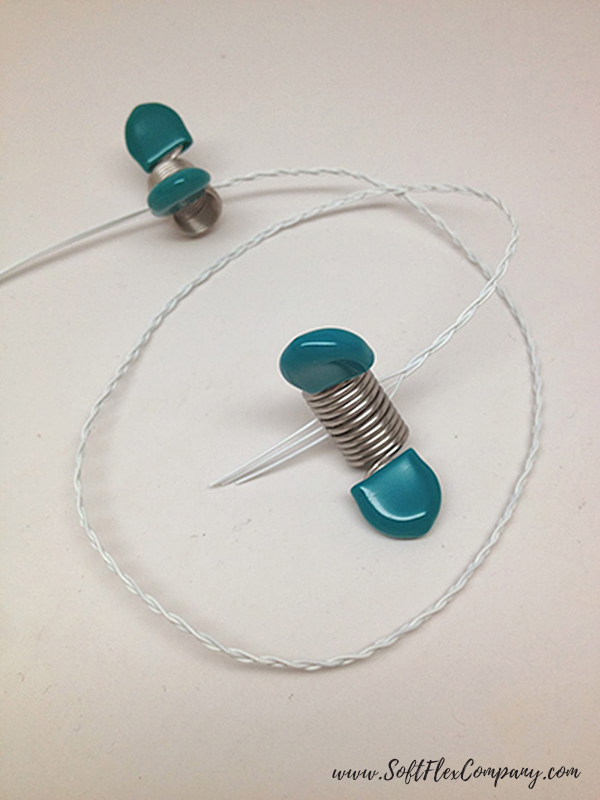
Step 2: Use the braid to string one crimp tube. Pass back through the tube to create a 22mm circle (top of snowman).
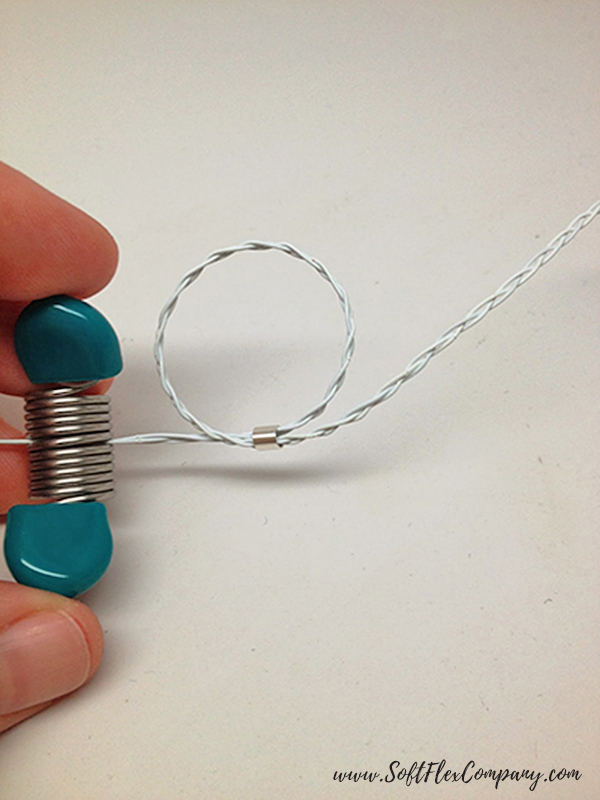
Step 3: Use the braid to string one crimp tube, 2 inches from the last one. Pass back through the tube to create a 48mm circle (bottom of snowman).
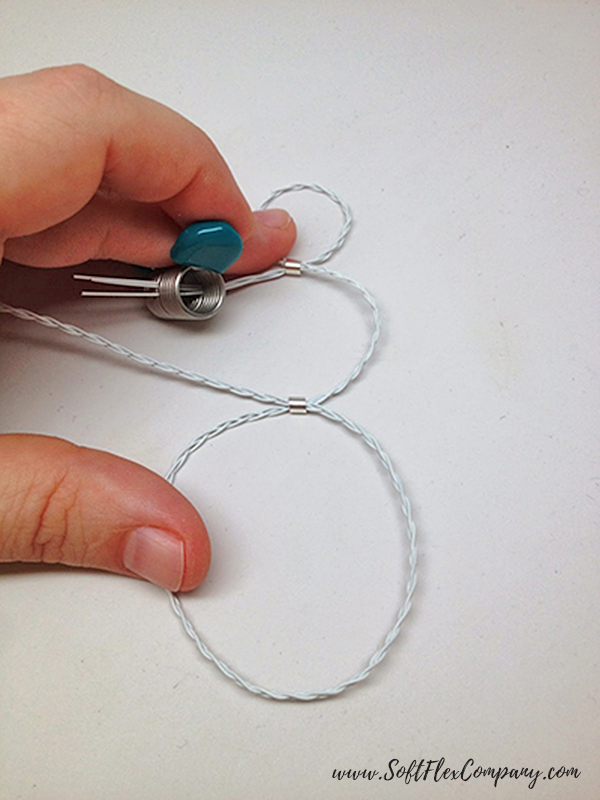
Step 4: Pass the braid back through the first crimp tube, creating a 30mm circle (middle of snowman).
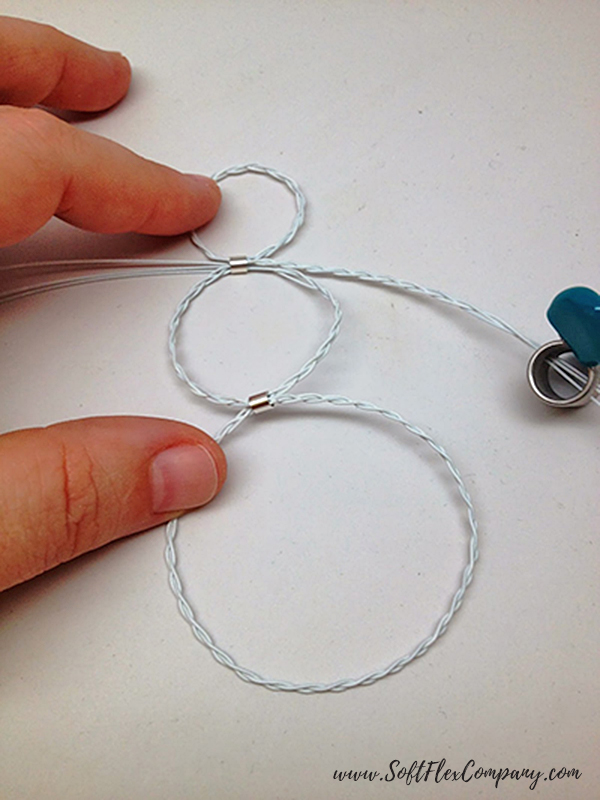
Step 5: Crimp both crimp tubes and cover with crimp covers. Hold the circles as straight as possible when you crimp. Trim excess wire. Click here for crimping instructions.
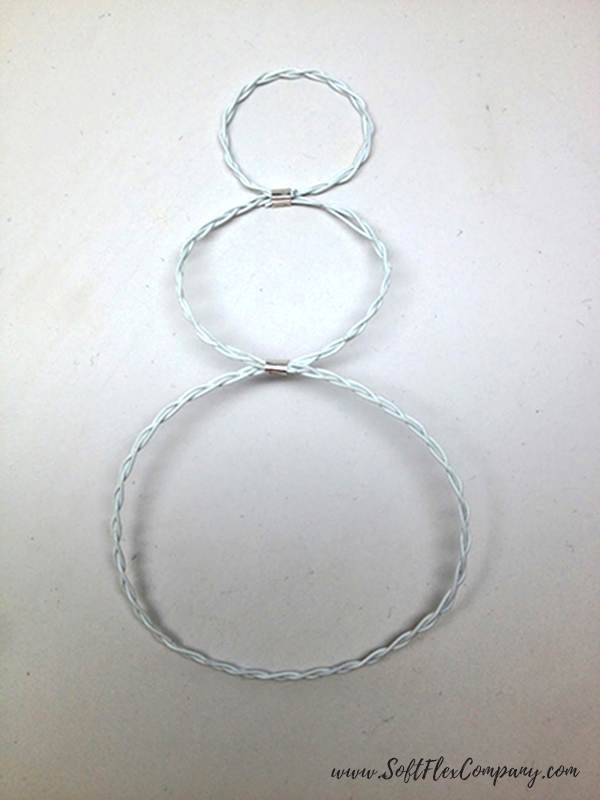
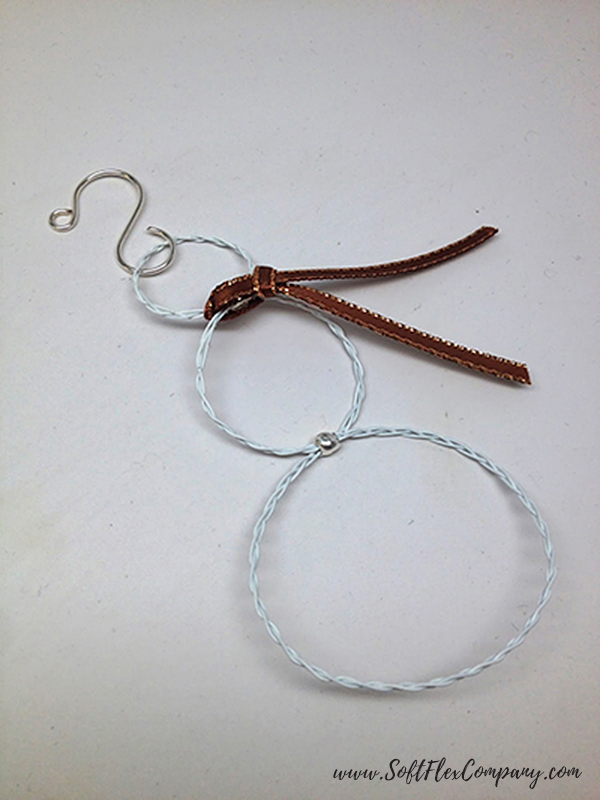
Step 6: Add a ribbon for a scarf and an ornament hanger. Please note that this ornament is unlikely to lay completely flat. If you find that the loops are not as flat as you like, fold them in the opposite direction until they straighten out more.
Little Ornaments for Grandma's Little Tree
Designer Jamie Hogsett
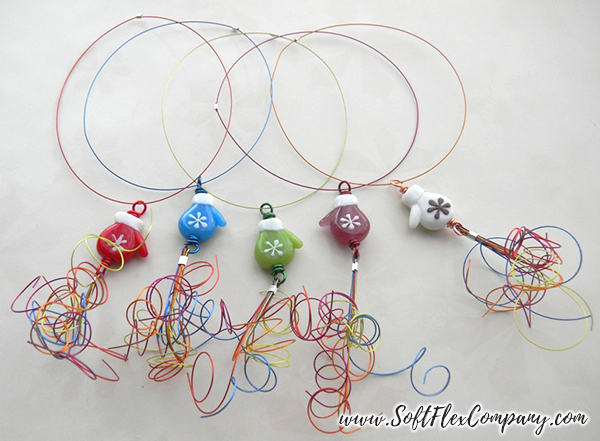
During my weekly Sunday phone call with Grandma, she mentioned how she has a tiny little Christmas tree this year. She told me how pretty it looked with white lights sparkling from it, but she had yet to put any ornaments on it because most of what she has is too big. So, here are some little ornaments that she can add to her pretty little tree, made with adorable glass mitten beads from
Rings & Things. They're bright and colorful and I really hope she likes them. Best of all, they're fun and really easy to make!
Materials
20ga Soft Flex Craft Wire in Peacock, Green, Burgundy, Red, and Non-Tarnish Copper
Econoflex Wire, .014 diameter in Steel Blue, Spring Green, Plum, Cinnamon Red, and Autumn Brown
2x2mm Sterling Silver Crimp Tubes - 5 crimps
3x3mm Sterling Silver Crimp Tubes - 5 crimps
17x16mm Glass Snowflake Mitten Beads - 5 beads (one each in blue, green, purple, red, and white)
Tools
Cutters
Crimping Pliers
Mighty Crimping Pliers
Scissors
Instructions
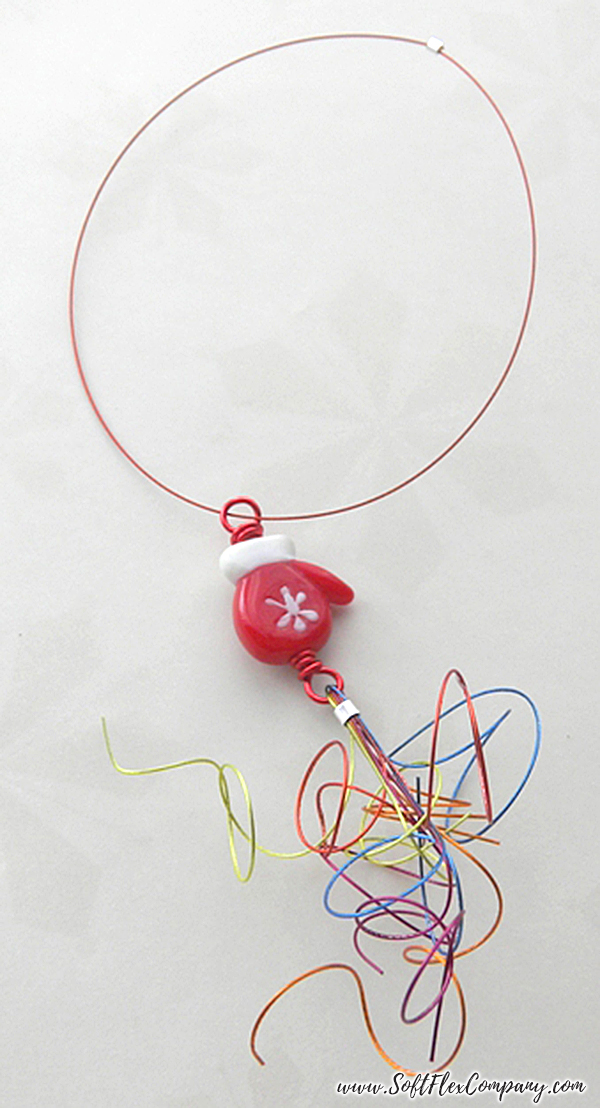
Step 1: Cut one 6" piece of each color of Craft Wire. Use the Peacock wire to form a wire-wrapped loop. String the blue mitten bead and form a wire wrapped loop. Repeat four times, using the Green wire for the green mitten bead, the Burgundy wire for the purple mitten bead, the Red wire for the red mitten bead, and the Copper wire for the white mitten bead.
Step 2: Cut six 9 1/2" pieces of each color of Econoflex. Hold one piece of each color wire together (five wires total) and use all the wires to string the bottom wire-wrapped loop of 1 mitten link. Hold all ten wire ends together and use them to string one 3mm x 3mm crimp tube. Push the tube up close to the wire-wrapped loop, and crimp using Mighty Crimpers.
Click here for crimping instructions. Repeat entire step for each mitten link.
Step 3: Use the remaining piece of Steel Blue Econoflex to string one 2mm x 2mm crimp tube and the top wire-wrapped loop of the blue mitten link. Pass the other end of the wire through the tube to make a circle, and crimp. Repeat for each ornament, using the Spring Green wire for the green mitten, the Plum wire for the purple mitten, the Cinnamon Red wire for the red mitten, and the Autumn Brown wire for the white mitten.
Step 4: Use scissors to curl all of the ends of Econoflex as you would with curling ribbon.
Join the fun in our VIB Facebook Group today! Stay in the know. Stay up to date. From our bead shows to our video shows and sales, you can stay in touch with us. The community is full of artistic and helpful beaders and crafty people. Inspire and be inspired. Share your pictures and get the beading bug from others!
Visit the Soft Flex Company YouTube Channel!
Blog contributor Thomas Soles is the Trade Show Coordinator for Soft Flex Company. His favorite stones are Lapis and Pietersite. His favorite hobby is day dreaming. And his favorite mustache is Tom Selleck's. As you can see, he has a healthy (or possibly unhealthy) sense of humor. You can write to him at Thomas@SoftFlexCompany.com


