

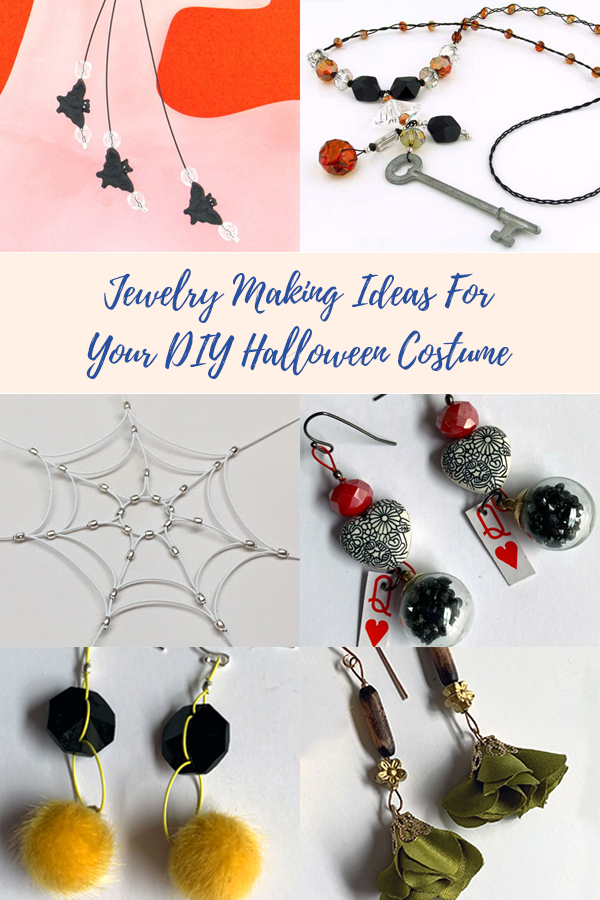
Who doesn't love Halloween? It is a great time for making jewelry. Halloween is a chance to be playful and create themed DIY holiday jewelry designs. You do not have to take yourself seriously. Craft a cute little cobweb. Add glam to your pirate gear. Sneak a little flair into your office attire. Or think out of the box and use the Queen of Hearts as part of your earring set. We're all a little mad here! Let's make this month magical and mysterious.


Join us for a live broadcast on the Soft Flex Facebook page, with the Spider Queen Design Kit, on Wednesday, September 28th at 1pm (PST).
If you'd like to join us in the design challenge next month, buy this kit and challenge yourself to try something new and unexpected. If you are new to beading, this kit comes with findings, beads, wire and surprises.
Supplies are very limited. Don’t miss out!
Spider Queen Pendant Or Bracelet

Designer Sara Oehler
Skill Level Beginner
Materials
Soft Flex .019 Beading Wire
2x2mm Crimp Tubes
Clasp, ear wires, chain or hair pick
Tools
Magical Crimping Pliers
Cutters
This spooky design is a Soft Flex favorite. Every year, it makes a comeback. It gets pinned, shared, and hopefully recreated. If you would like to watch Sara design this, check out her Facebook Live Video. You can do so much with this little decoration. You can easily make this design into a pendant, earrings, hair accessory or bracelet. Enjoy!

Step 1: String seven crimps on 6 inches of beading wire. Pass the wire back through the first crimp to create a 10mm circle in the middle of the wire. Crimp the tube and trim each wire to be 2 inches long.
Step 2: String one 4 inch wire through a crimp tube and center the wire. Crimp the tube, evenly spacing each crimp apart around the 10mm circle. Repeat this five times.

Step 3: Using both wires next to each other, string a crimp tube. Crimp the tube about 5mm from the base. Trim off the extra wire. Repeat this six times.

Step 4: String a crimp tube on two of the legs next to each other. String a 3 inch wire through each crimp tube. Repeat six times. Adjust the crimps to be about 10mm from the last crimp tube. Crimp the tubes and cut off two extra wires (leaving just one).

Step 5: String a crimp tube on each leg.
Step 6: String a 5 inch wire through a crimp tube on two legs next to each other, connecting the two legs.
Step 7: String a 2.5 inch wire through a crimp tube on the next two legs next to each other, connecting the two legs.
Step 8: Repeat Step 6.
Step 9: Repeat Step 5 (To make the bracelet as shown below or a hair accessory. For a pendant or earrings, you can use 2.5 inches of wire here too).
Step 10: Repeat Step 6 three times.
Step 11: Adjust the crimps to be about 5mm from the last crimp tube. Crimp the tubes and cut off two extra wires (leaving just one). Trim the short wires to 5-7mm long.

Step 12: String a crimp on one of the longer wires, pass through the clasp and back into the crimp. Crimp the tube and trim excess wire. There is about 45mm between crimps on my bracelet, but you'll need to make it to fit your wrist.
Step 13: Repeat Step 11 for the second side by making a simple loop for your clasp to connect to or by connecting to the second half of a clasp.
Note: If you prefer to make earrings, create a loop on the longer wire closer to the spider web and attach to ear wires. If you prefer a pendant, create a loop on the longer wire closer to the spider web and attach to a chain. If you prefer a hair accessory, create loops on both sides and use a hair pick or bobby pins to attach the web into your hair.
You can add clear beads to make this design sparkle. Sara suggests a single black bead to look like a spider.
Soft Flex Beading Wire comes in a lots of different colors. She used white, but you could use silver, gold, black, satin silver, etc.

Simple Earring Ideas For Your DIY Halloween Costume!
Kristen filmed an enchanting Halloween inspired video for an episode of Free Spirit Beading. She is a wizard at making earrings with Soft Flex Beading Wire. She showed us how to cast a spell with some creative earrings for the eeriest night of the year.

Kristen found some creative DIY costumes online. She thought it would be fun to make matching earrings for the costumes. If you are a Queen of Hearts, a Bumble Bee or Woodland Forest Fairy, you can sleep easy tonight, Kristen has some bewitching ideas for you. You guys are covered this year if you want to make an otherworldly set of earrings for your costumes.

Supplies:
Soft Flex Medium Beading Wire in Yellow, Red Coral and Copper Color
Night Blooming Inspiration Bead Mix
Wood
Beads
Flower Beads (from Saraswati bead mix)
Queen of Hearts Playing Card
Jump Rings
Ear Wires
2x2mm Soft Flex Crimp Tubes
Crimping Pliers
Chain Nose
Pro Flush Cutters
Bead Mat
Scissors
Beading Awl
Mini Macrame Board

We would love to see your handiwork. If you make Halloween jewelry, post your spookiest on our Facebook group – VIB. There are sure to be plenty of bone-chilling creations that will be posted soon. Our group is lively and full of fun jewelry designers and crafty folk. We embrace creativity and nuture a postive environment. We would love to talk jewelry with you! VIB is also a fantastic place to find tips and tricks if you would like to become a better designer or learn a new jewelry medium.

Pirate's Necklace

Designer Jamie Hogsett
Skill Level Intermediate
Materials
Black Onyx Soft Flex Beading Wire .024 diameter
Black Onyx Soft Flex Beading Wire .019 diameter
2x2mm Sterling Silver Crimp Tubes - 8 pcs
3x3mm Sterling Silver Crimp Tubes - 2 pcs
3mm Sterling Silver Crimp Covers - 8 pcs
4mm Sterling Silver Crimp Covers - 2 pcs
75mm Antique Key - 1 pc
4x3mm Crystallized Swarovski Elements Silver Shade Rondelles - 2 pcs
4x3mm Crystallized Swarovski Elements Jet Rondelles from
Atlantic Gems - 12 pcs
6x4mm Crystallized Swarovski Elements Crystal Chili Rondelles - 20 pcs
12x8mm Crystallized Swarovski Elements Silver Shade Rondelles - 4 pcs
12x8mm Crystallized Swarovski Elements Crystal Verde Rondelle - 1 pc
18mm Crystallized Swarovski Elements Crystal Copper Rondelle - 1 pc
12mm Crystallized Swarovski Elements Crystal Red Magma Round - 1 pc
12mm Crystallized Swarovski Elements Silver Shade Graphic Bead - 1 pc
16mm Crystallized Swarovski Elements Jet Cosmic Beads - 3 pcs
27x15mm Crystallized Swarovski Elements Crystal Moonlight Galactic Bead - 1 pc
Tools
Crimping Pliers
Cutters
Mighty Crimpers
Bead Stoppers
Instructions
Finished Size: 28" plus 5 1/4" dangle
Step 1: Use 3" of .019 diameter wire to string one 2mm crimp tube to the very end of the wire. Crimp the tube and cover it with a 3mm crimp cover. Use the other end of the wire to string one 4x3mm silver shade rondelle, 1 Cosmic bead, one 4x3mm silver shade rondelle, and one 2mm crimp tube. Pass back through the tube, leaving a small loop of wire, and crimp. Cover the tube with a 3mm crimp cover. Set aside.
Step 2: Use 4" of .019 diameter wire to string one 2mm crimp tube and the antique key. Pass back through the tube, snug the tube close to the key, and crimp. Cover the tube with a 3mm crimp cover. Use the other end of the wire to string 1 crystal Verde rondelle and one 2mm crimp tube. Pass back through the tube, leaving a small loop of wire, and crimp. Cover the tube with a 3mm crimp cover. Set aside.
Click here for crimping instructions.
Step 3: Use 5" of .019 diameter wire to string one 2mm crimp tube and the crystal copper rondelle. Pass back through the tube, making sure the wires are even on the sides of the rondelle, and crimp. Cover the tube with a 3mm crimp cover. Use the other end of the wire to string 1 jet rondelle, the Graphic bead, 1 jet rondelle, and one 2mm crimp tube. Pass back through the tube, leaving a small loop of wire, and crimp. Cover the tube with a 3mm crimp cover.

Step 4: Use 4" of .019 diameter wire to string one 2mm crimp tube, the open loop of wire formed in Step 1, the open loop of wire formed in Step 2, and the open loop of wire formed in Step 3. Pass back through the tube, leaving a small loop of wire, and crimp. Cover the tube with a 3mm crimp cover. Use the other end of wire to string 1 crystal chili rondelle, the Galactic bead, 1 crystal chili rondelle, and one 2mm crimp tube. Pass back through the tube, leaving a small loop of wire, and crimp. Cover the tube with a 3mm crimp cover.
Step 5: Cut 9" of .024 diameter wire. Place a Bead Stopper on one end of the wire. Use the other end of the wire to string one 3mm crimp tube, 1 jet rondelle, one 12x8mm silver shade rondelle, 1 jet rondelle, 1 crystal red magma round, 1 jet rondelle, one 12x8mm silver shade rondelle, 1 jet rondelle, 1 Cosmic bead, 1 jet rondelle, the loop of wire formed in Step 4, 1 jet rondelle, 1 Cosmic bead, 1 jet rondelle, one 12x8mm silver shade rondelle, 1 jet rondelle, 1 crystal red magma round, 1 jet rondelle, one 12x8mm silver shade rondelle, 1 jet rondelle, and one 3mm crimp tube. Place a Bead Stopper on the wire end. Set aside.

Step 6: Cut three 35" pieces of .024 diameter wire. Place one Bead Stopper on one end of all three wires, about 2" from the wire ends. Use 1 wire to string 18 crystal chili rondelles. Place a Bead Stopper on the end of this wire.
Step 7: Braid the wires for about 1/2", then move one rondelle up and incorporate it into the braid.

Step 8: Repeat Step 7 eight times. Braid the wires for about 10 1/2". Move one rondelle up and incorporate it into the braid. Repeat Step 7 eight times.

Step 9: Remove the Bead Stopper holding the single strand of wire and remove one of the Bead Stoppers used in Step 5.
Step 10: Pass the three braided wire ends through the crimp tube in the opposite direction as the wire already through the tube. Adjust the braided wires so that the crimp tube is about 1/2" from the first crystal rondelle, and crimp. Cover the tube with a 4mm crimp cover. Carefully trim wire ends.
Step 11: Remove the remaining Bead Stoppers and repeat Step 5, making sure to snug the beads strung onto the single .024 diameter wire before crimping. Carefully trim wire ends.

Ahoy, matey. Wear your Halloween booty with pride. You've scuttled the finest in the enemies fleet and have the loot to prove it. Raise your Jolly Roger! Make your shipmates jealous of your jewelry and send any scallywags down into Davy Jones's Locker in style.

Holy Bat Earrings

Designer Jessica L. Rosenfeld
Skill Level Intermediate
Materials
Black Soft Flex Beading Wire .019 diameter - 30"
Teeny Tiny Black Ceramic Bat Beads - 6 pcs
2x2mm Sterling Silver Crimp Tube - 12 pcs
Sterling Silver Leverback Earwires - 1 pair
4mm Clear Czech Glass Faceted
Beads - 12 pcs
6mm Sterling Silver
Split Rings - 2 pcs
Tools
Regular Crimpers
Cutters
Instructions
Step 1: Cut 2-4" lengths, 2-5" lengths, and 2-6" lengths of Soft Flex Wire from the spool.
Step 2: Crimp a crimp tube at the bottom of each of the 6 strands, using crimping pliers.Cut off any excess wire below the crimp using Flush Cutters.
Step 3: On each of the 6 strands, place one clear Czech glass bead, one Ceramic Bat, and one clear Czech glass bead.
Step 4: Starting with the shortest strand, place other end of wire through a crimp tube, through the split ring, and back through the crimp tube. Once desired length is measured (I have made my shortest 3"), secure crimp using crimping pliers.
Step 5: Repeat step 4, only making the length longer (I have my middle strand 4" long).
Step 6: Repeat step 4 for the longest length (mine is 5" long).
Step 7: Place split ring, which should have 3 graduated lengths of Soft Flex, through leverback earwire, into notch where it will stay in place.
Step 8: Repeat steps 4-7 for other earring.

Join the fun in our VIB Facebook Group today! Stay in the know. Stay up to date. From our bead shows to our video shows and sales, you can stay in touch with us. The community is full of artistic and helpful beaders and crafty people. Inspire and be inspired. Share your pictures and get the beading bug from others!
Visit the Soft Flex Company YouTube Channel!


Blog contributor Thomas Soles loves Jazz Age writers and crunchy french fries. His favorite gemstones are Lapis and Pietersite. His favorite hobby is day dreaming. And his favorite mustache is Freddie Mercury's. As you can see, he has a healthy (or possibly unhealthy) sense of humor. You can write to him at Thomas@SoftFlexCompany.com