

Can somebody please pinch me, how in the world is it already St. Patrick's Day? This year is a blur. I am going to need some luck if I want to keep up with my little leprechaun. My wee little laddy is two years old and he has kept me so busy I have barely had time to breathe.

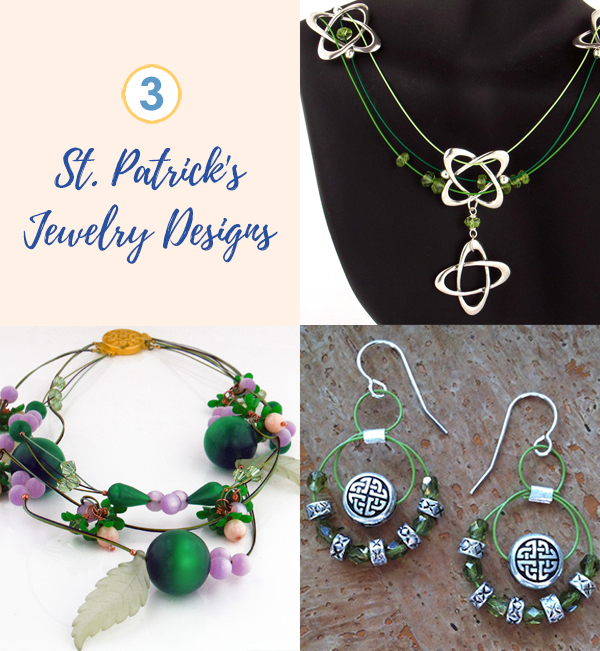
Are you as busy as I am? If so, here are some fine free jewelry project ideas to get you ready for the greenest holiday of the year. These beauties will stave off the army of eager pinchers. They are also great for a spring wardrobe.
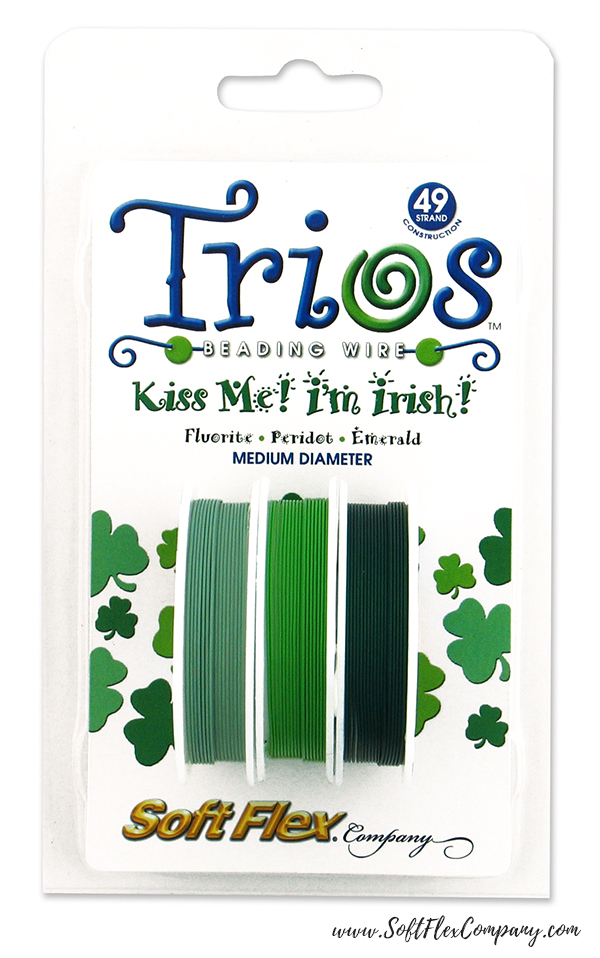
Kiss Me! I'm Irish! Trios Beading Wire Packs are a little pot of gold when you need some green wire to add to your jewelry making kit. Whatever shamrocks you string on this set of wire is sure to make a stunning necklace. Your friends will be green with envy.
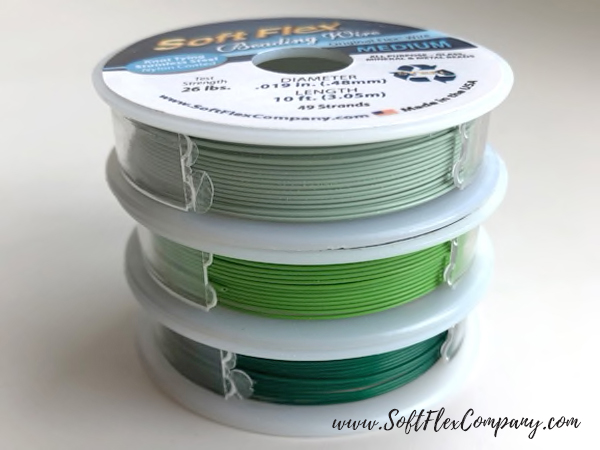
Kiss Me! I'm Irish! Trios is the perfect beading wire choice for our lovely green beads. Thank your lucky clovers! It is going to be easy to make some fun jewelry this St Paddy's Day.

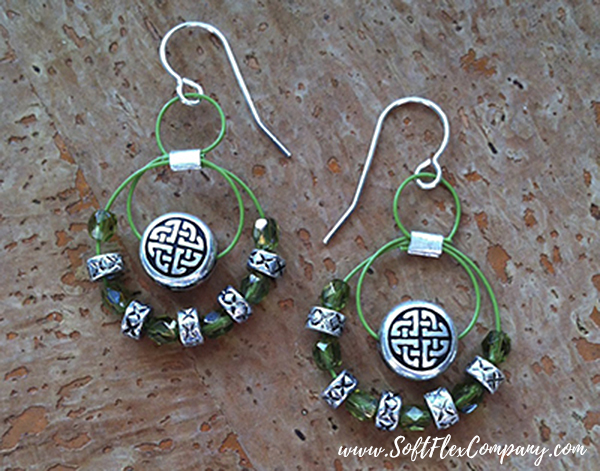
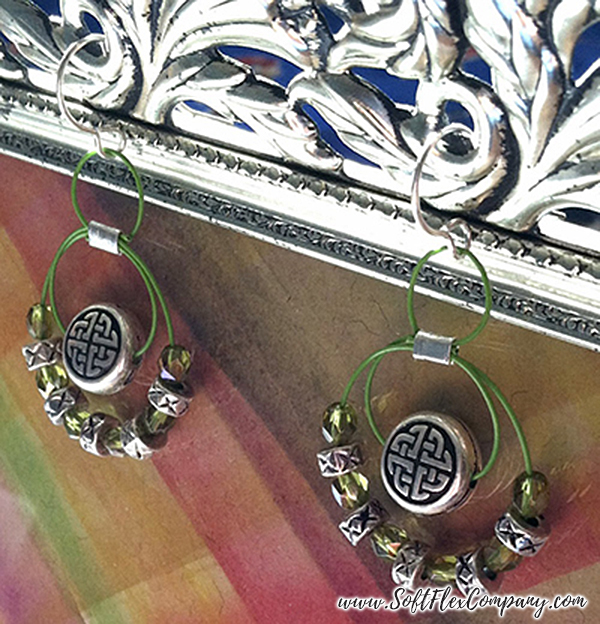
Celtic Bead Dangles
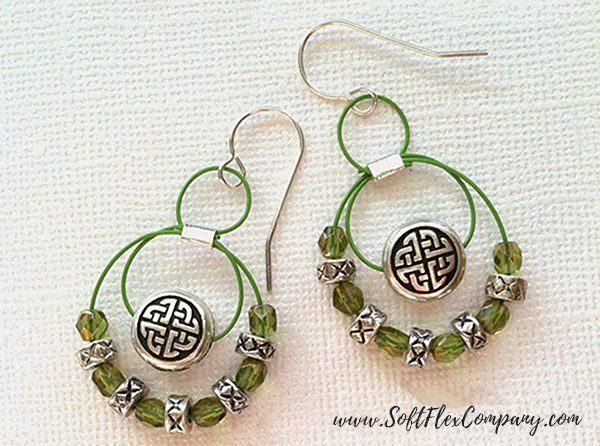
Designer Kristen Fagan
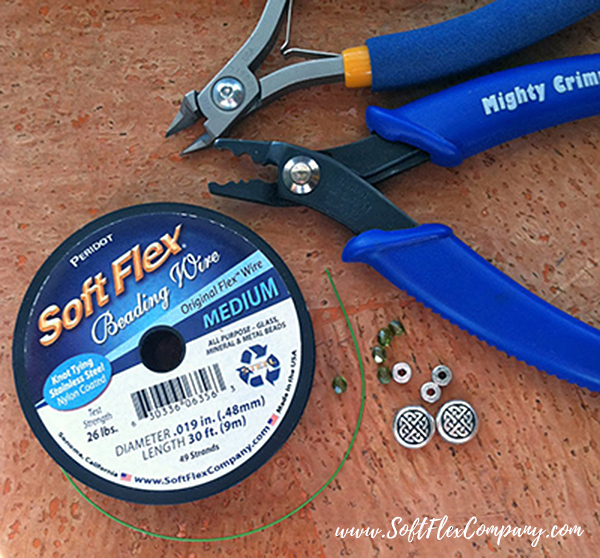
Materials
Soft Flex Beading Wire, .019 Diameter - 16"
TierraCast 10mm Celtic Beads from Fusion Beads - 2 pcs
4mm Olivine Fire Polished Beads from Fusion Beads - 12 pcs
Silver Spacer Tubes/Beads - 10 pcs
Silver Ear Wires - 1 pair
3x3mm Silver Filled Crimp Tubes - 2 pcs
Tools
Mighty Crimping Pliers
Chain Nose Pliers
Cutters
Instructions
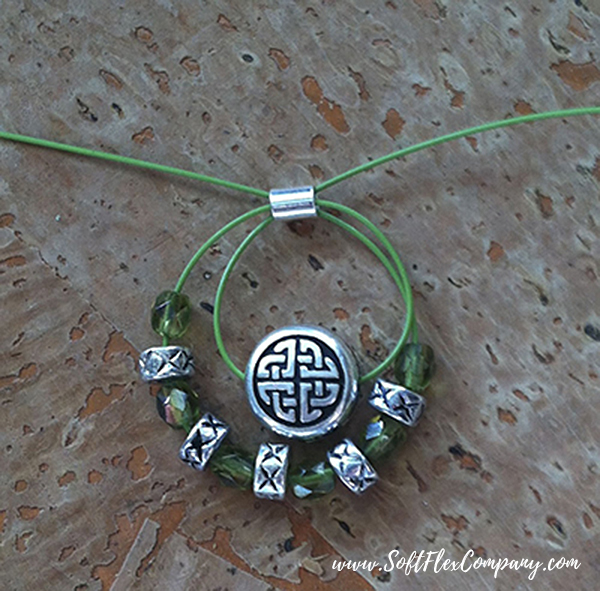
Step 1: Cut Soft Flex Beading Wire into two 8" lengths, one for each earring. String Celtic style bead, then crimp tube. Take the other end of the wire make a circle back through the crimp tube for your first loop. Now using the tail that went through the crimp for the loop, string your beads for the second loop. Alternate 1 olivine fire polish bead and 1 silver spacer tube until you have 6 green fire polish beads and 5 spacer tubes. Then take the tail and feed it through the crimp tube again making your second loop.
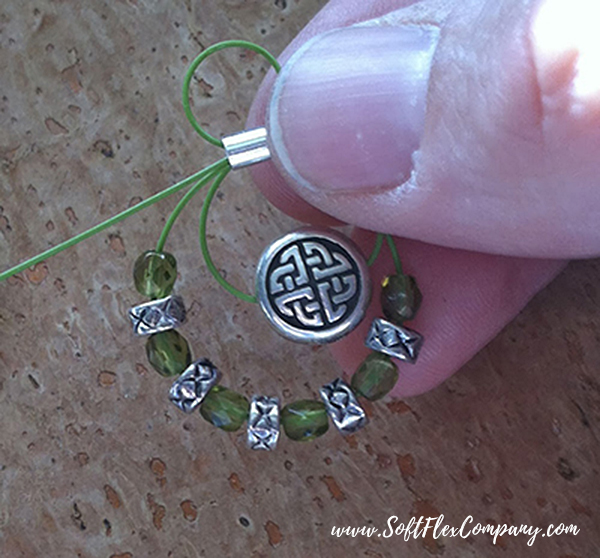
Step 2: Now take the longer wire tail and feed it through the crimp tube in the opposite direction making a small loop at the top. This little loop will attach to your ear wire. Adjust wires until you are happy with size of all three loops. When ready, use your Mighty Crimping Pliers to close the crimp tube.You use the Mighty Crimping Pliers just like the Regular Crimping Pliers. Click here for crimping instructions.
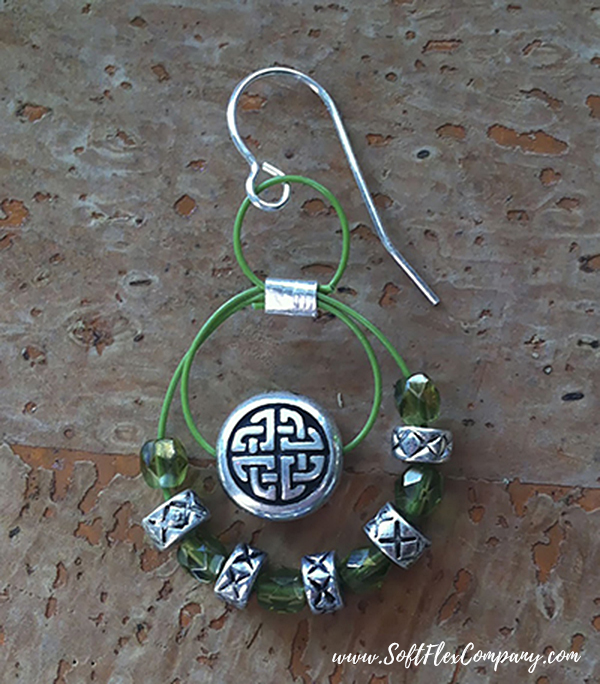
Step 3: Finally, trim off the excess wire close to the crimp and use your chain nose pliers to attach you ear wire to the top loop. Make your second earring the same way. When making the second earring pay attention to the loop sizes of all three loops before crimping.
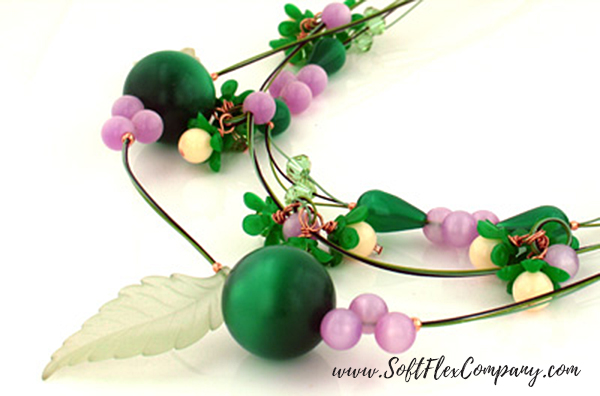
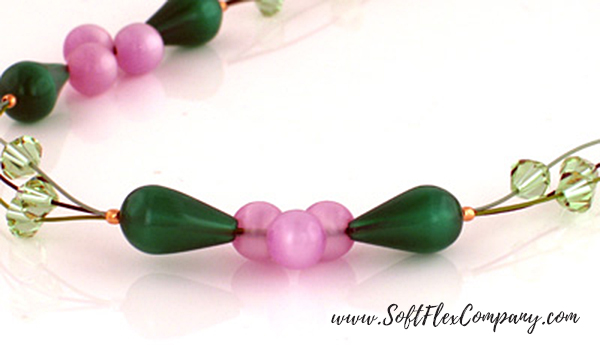
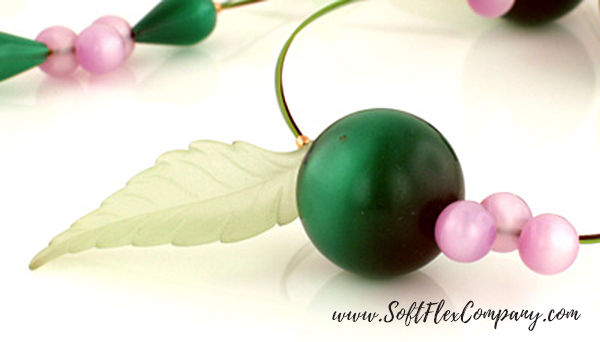
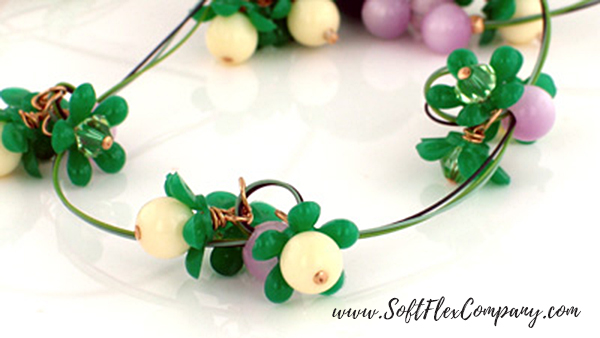
Kiss Me! I'm Irish! Necklace
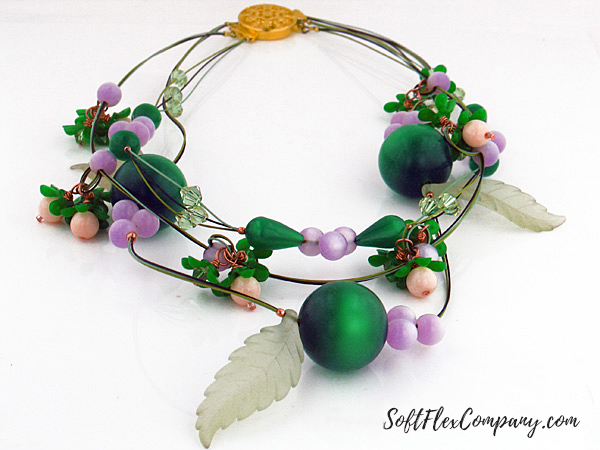
Designer Jamie Hogsett
Skill Level Intermediate
Materials
Kiss Me! I'm Irish! Trios Beading Wire Set (Green Emerald, Peridot, Fluorite)
22mm Gold 5-Strand Box Clasp - 1 set
2x2mm Gold-Filled Crimp Tubes - 18 pcs
3mm Gold-Filled Crimp Covers - 9 pcs
22-Gauge Gold-Filled Head Pins - 18 pcs
Ecru-lined Crystal AB Japanese Size 11° Seed Beads - 9 pcs
6mm Crystallized Swarovski Elements Cantaloupe Bicones - 21 pcs
13mm Vintage Hard Plastic Kelly Green 5-Petal Flowers - 18 pcs
8mm Vintage Lucite Muted Light Lavender Moonglow Side-Drilled Button Rounds - 24 pcs
8mm Vintage Lucite Opaque Jonquil Rounds - 9 pcs
9x16mm Vintage Lucite Emerald Moonglow Tear Drops - 6 pcs
22mm Vintage Lucite Emerald Moonglow Rounds - 3 pcs
20x41mm Vintage German Lucite Matte Deep Mint Leaf Pendants - 3 pcs
Tools
Cutters
Crimping Pliers
Magical Crimping Pliers
Instructions
Finished Size: (please measure necklaces from clasp end to clasp end, without including any extra pendant length) 18 1/4" (shortest strand), 20 3/4" (center strand), 22 1/2" (longest strand).
Step 1: Cut 21 1/2" of Green Emerald wire, Peridot wire, and Fluorite wire.
Step 2: Use all three wires to string 1 crimp tube, 1 tear drop (wide end first), 3 Lavender Moonglow button rounds, 1 tear drop (narrow end first), and 1 crimp tube.
Step 3: Move the beads to the center of the wires and crimp both crimp tubes using Magical Crimping Pliers. Click here for Magical Crimping Pliers instructions.
Step 4: Use one end of the Green Emerald wire to string 1 crystal bicone. Repeat using the Peridot and Fluorite wires.
Step 5: Repeat Step 2. Place the first crimp tube string so that it is 2" from the previous crimp tube, and crimp using Magical Crimping Pliers. Snug the beads and crimp the other crimp tube. Repeat Step 4. Use all three wires to string 1 crimp tube. Place the tube 3 5/8" from the previous tube and crimp using Magical Crimping Pliers. Trim the Peridot and Fluorite wires. Use the remaining Green Emerald wire to string 1 crimp tube and the inside loop of one half of the clasp. Pass back through the tube and crimp using Crimping Pliers. Click here for crimping instructions. Cover the tube with a crimp cover.
Step 6: Repeat Step 4 using the other ends of the wires. Repeat Step 5.
Step 7: Use 1 head pin to string 1 seed bead, 1 Jonquil Round, and one 5-Petal Flower. Form a wire wrapped loop. Repeat eight times to make a total of nine Jonquil dangles. Use 1 head pin to string 1 Bicone and one 5-Petal Flower. Form a wire wrapped loop. Repeat eight times to make a total of nine Bicone dangles.
Step 8: Cut 24" of Green Emerald wire, Peridot wire, and Fluorite wire. Use all three wires to string 1 Lavender Moonlight Button Round to 5 1/2" from the ends of the wires. *String 1 Bicone dangle, 1 Jonquil dangle, and 1 Bicone dangle. Pass through the Lavender Moonlight Button Round again. Use all three wires to string 1 Lavender Moonlight Button Round so that it is about 2" from the previous Button Round. String 1 Jonquil dangle, 1 Bicone dangle, and 1 Jonquil dangle. Pass through the Button Round again. Use all three wires to string 1 Lavender Moonlight Button Round so that it is about 2" from the previous Button Round. Repeat from * twice.
Step 9: Use all three wires to string 1 crimp tube. Place the tube 3 1/2" from the last Button round and crimp using Magical Crimping Pliers. Trim the Green Emerald and Fluorite wires. Use the remaining Peridot wire to string 1 crimp tube and the middle loop of one half of the clasp. Pass back through the tube and crimp using Crimping Pliers. Cover the tube with a crimp cover. Repeat entire step using the other ends of the wires.
Step 10: Cut 26 1/2" of Green Emerald wire, Peridot wire, and Fluorite wire. * Use all three wires to string 1 crimp tube, 1 Leaf Pendant, 1 Emerald Moonlight Round, 3 Lavender Moonlight Button rounds, and 1 crimp tube. Center the beads on the wire and crimp both tubes using Magical Crimping Pliers. Use Crimping Pliers to place a crimp cover over the crimp tube next to the Button Round, to keep the bead from slipping over the crimp tube. Repeat from * once, placing and crimping the first crimp tube 2 1/2" from the previous tube.
Step 11: Use the other ends of the wire to string 1 crimp tube, 3 Lavender Moonlight Button Rounds, 1 Green Emerald Moonlight Round, 1 Leaf Pendant, and 1 crimp tube. Place the first crimp tube 2 1/2" from the first crimp tube strung in Step 10 and crimp using Crimping Pliers. Cover the tube with a crimp cover. Snug the beads and crimp the other crimp tube using Magical Crimping Pliers.
Step 12: Use all three wires to string 1 crimp tube. Place the tube 5 1/2" from the next crimp tube and crimp using Magical Crimping Pliers. Trim the Green Emerald and Peridot wires. Use the remaining Fluorite wire to string 1 crimp tube and the outside loop of one half of the clasp. Pass back through the tube and crimp using Crimping Pliers. Cover the crimp tube with a crimp cover. Repeat entire step using the other ends of the wires.
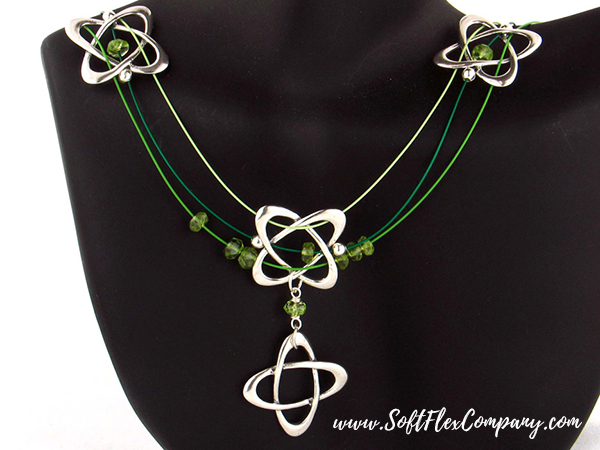
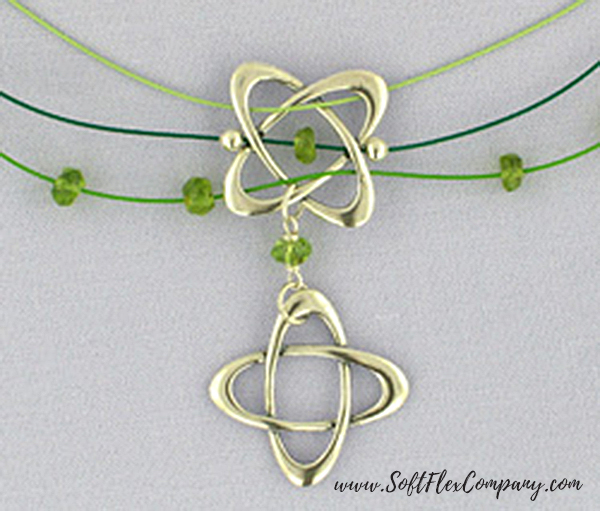
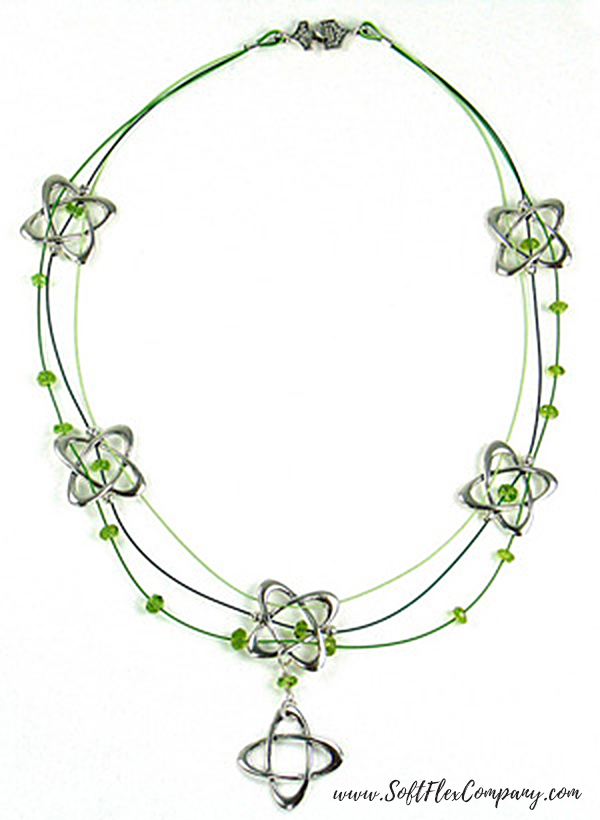
Lucky Clover Necklace
Designer Jamie Hogsett
Skill Level Beginner
Materials
Renewal Trios Beading Wire Set (Emerald, Chrysoprase, Peridot)
Sterling Silver Cast Jewelry Hook and Eye Clasp - 1 set
2x2mm Sterling Silver Crimp Tubes - 10 pcs
3x3mm Sterling Silver Crimp Tubes - 2 pcs
3mm Sterling Silver Crimp Covers - 10 pcs
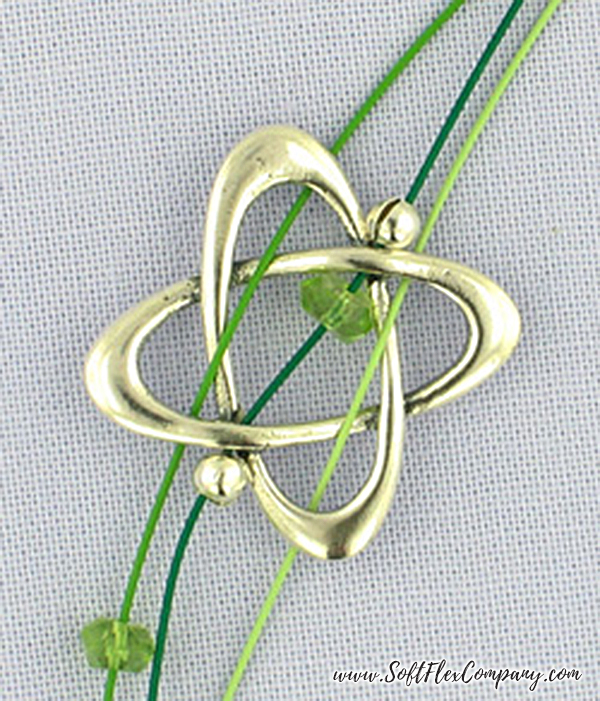
27mm Sterling Silver Orbit Bead Frame - 6 pcs
5mm Sterling Silver Open Jump Ring - 2 pcs
24 gauge 2" Sterling Silver Head Pin - 1 pc
5mm Peridot Faceted Rondelles - 18 pcs
Tools
Crimping Pliers
Cutters
Mighty Crimping Pliers
Bead Stoppers
Instructions
Step 1: Cut 23" of Emerald wire. Place a Bead Stopper at one end of the wire. Use the other end of the wire to string *one 2mm x 2mm crimp tube, the first hole of 1 bead frame, 1 peridot rondelle, the second hole of the bead frame, and one 2mm x 2mm crimp tube. Repeat from * four times. Place a Bead Stopper on the other end of the wire.
Step 2: Center the middle bead frame on the wire and crimp the crimp tubes snugly on each side of the bead frame. Cover both crimps with crimp covers. Repeat for the other bead frames, making sure to place each bead frame 2" from the previous bead frame. Remove Bead Stoppers.
Step 3: Cut 23" of Peridot wire. Place a Bead Stopper at one end of the wire. Use the other end of the wire to *pass through the first bead fame on the Emerald wire by passing the Peridot wire from the bottom to the top and then top to bottom through the bottom half of the bead frame. String 3 Peridot rondelles. Repeat from * four times, omitting stringing the final 3 Peridot rondelles. Place a Bead Stopper on the other end of the wire.
Step 4: Cut 23" of Chrysoprase wire. Repeat Step 3, omitting the Peridot rondelles, and passing the Chrysoprase wire through the top half of each bead frame.
Step 5: Adjust the Peridot wire so that it is slightly longer that the Emerald wire between each bead frame. Adjust the Chrysoprase wire so that it is slightly shorter than the Emerald wire between each bead frame.
Step 6: Remove Bead Stoppers. Use all three wires to string one 3mm x 3mm crimp tube and one half of the clasp. Pass back through the tube. Adjust the wires so that the crimp tube is 2 1/4" from the previous crimp tube, and crimp. Repeat entire step for the other end of the necklace.

Step 7: Use Cutters to cut the end off of the head pin. Form a wire wrapped loop. String 1 Peridot rondelle and form a wire wrapped loop. Use 1 jump ring to attach 1 wire wrapped loop to the center bead frame on the necklace. Use 1 jump ring to attach the other wrapped loop to 1 bead frame.
Join the fun in our VIB Facebook Group today! Stay in the know. Stay up to date. From our bead shows to our video shows and sales, you can stay in touch with us. The community is full of artistic and helpful beaders and crafty people. Inspire and be inspired. Share your pictures and get the beading bug from others!
Visit the Soft Flex Company YouTube Channel!


Blog contributor Thomas Soles loves Jazz Age writers and crunchy french fries. His favorite gemstones are Lapis and Pietersite. His favorite hobby is day dreaming. And his favorite mustache is Freddie Mercury's. As you can see, he has a healthy (or possibly unhealthy) sense of humor. You can write to him at Thomas@SoftFlexCompany.com